There is a special kind of satisfaction in watching a simple round of dough suddenly balloon into a perfect pocket right in your own pan. This three‑ingredient pita bread proves that you do not need yeast, complicated techniques or specialist equipment to achieve that classic, hollow centre. With just flour, salt, a little oil and warm water, you create a soft, pliable dough that transforms into light, puffed breads in a matter of minutes. As the dough hits the hot pan, steam inside pushes the layers apart, forming that beautiful pocket that is ideal for stuffing with fillings or tearing into pieces for dipping. The process feels almost magical the first time you see it, yet it is entirely repeatable once you understand the rhythm of rolling thinly and cooking over high heat. Each pita emerges with golden spots, a gentle chew and a tender crumb that tastes far fresher than anything wrapped in plastic from the shop. Even if you have never made flatbread before, this method is calm, approachable and forgiving, guiding you from flour in a bowl to a stack of warm breads under a towel. These pitas are perfect for wraps, sandwiches, mezze platters or simply for scooping up hummus and sauces. Once you have made them once, you will find yourself returning to this recipe whenever you want bread that feels both simple and special.
🥙 Turn Flour, Water And A Little Oil Into Proper Pocket Pitas Cooked Fresh In Your Own Pan
⏱️ Quick Overview
Prep Time: 20 minutes (plus 30–40 minutes resting)
Cook Time: 15–20 minutes
Total Time: 65–80 minutes
Servings: 8 pitas
Difficulty: Easy
Category: Flatbread / Pocket Bread
Cuisine: Middle Eastern‑Inspired Home Baking
Calories: ~190 kcal per pita
🔥 Watch Each Thin Disc Of Dough Puff Into A Hollow Bread Ready For Your Favourite Fillings
⭐ Why You’ll Love This Recipe
- Only Three Core Ingredients: Flour, salt, oil and water come together to create proper pocket bread without yeast.
- Classic Pita Pocket: The breads puff in the pan, forming a hollow centre that is perfect for stuffing with your favourite fillings.
- No Oven Required: Everything is cooked on the hob in a dry pan, making this ideal for small kitchens or hot days.
- Soft Yet Sturdy Texture: The pitas are flexible enough to fold but strong enough to hold generous fillings without tearing easily.
- Quick Rest, Not Long Proofing: A short resting time relaxes the dough and encourages puffing without lengthy fermentation.
- Versatile At The Table: Use them for wraps, sandwiches, mezze platters, dipping or as a simple side to soups and salads.
- Beginner‑Friendly Technique: Clear steps and simple handling make this a great introduction to homemade flatbreads.
🍞 Swap Shop‑Bought Wraps For Warm, Homemade Pitas That Taste Soft, Fresh And Comfortingly Simple
📅 Nutrition Per Serving (entire recipe, 8 pitas)
For the whole batch (8 pitas):
- Calories: ~1,520 kcal
- Protein: ~42 g
- Fat: ~28 g
- Carbohydrates: ~270 g
- Fibre: ~9 g
- Sugars: ~1 g
Per pita (1/8 of the dough):
- Calories: ~190 kcal
- Protein: ~5 g
- Fat: ~3.5 g
- Carbohydrates: ~34 g
- Fibre: ~1 g
- Sugars: ~0.1 g
(Values are approximate and depend on the exact flour and oil used.)
🥙 Enjoy Flatbreads That Are Light Enough To Fold Yet Strong Enough To Hold Generous Sandwiches
👨🍳 DETAILED STEP‑BY‑STEP RECIPE (Chef‑Level Instructions)
Step 1: Combine The Dry Ingredients
Place the all‑purpose flour and salt into a large mixing bowl and stir them together so the salt is evenly dispersed throughout the flour.
💡 Mixing the salt thoroughly at this stage ensures every piece of dough is seasoned evenly, which makes the finished pitas taste balanced rather than bland.
Step 2: Add Oil And Warm Water
Pour the vegetable oil and warm water into the bowl with the flour and salt, then begin mixing with your hand or a spoon until a shaggy dough forms.
💡 The water should feel pleasantly warm, not hot; if it is too hot, it can tighten the dough and make it harder to knead smoothly.
🌿 Bring Middle Eastern‑Style Pocket Bread To Your Table With Just Three Everyday Ingredients
Step 3: Knead To A Soft, Smooth Dough
Turn the dough out onto a clean surface and knead for about 8–10 minutes until it becomes soft, smooth and slightly elastic, adding only a light dusting of flour if it feels very sticky.
💡 Aim for a dough that feels supple and just a little tacky; adding too much extra flour will make the pitas dry and less likely to puff well.
Step 4: Rest The Dough
Shape the dough into a ball, place it back into the bowl, cover with a clean cloth or cling film and let it rest at room temperature for 30–40 minutes.
💡 This resting time allows the gluten to relax, which makes the dough easier to roll thinly and helps the layers separate to form the pocket during cooking.
🍽️ Serve These Pitas With Hummus, Salads Or Grilled Meat And Instantly Elevate A Simple Meal
Step 5: Divide The Dough Evenly
After resting, gently turn the dough out and divide it into 8 equal pieces, shaping each piece into a smooth ball by tucking the edges underneath.
💡 Try to keep the pieces similar in size so they cook at the same rate and you end up with evenly sized pitas that look neat on the plate.
Step 6: Pre‑Shape And Rest Briefly
Flatten each dough ball slightly with your hand into a small disc, then cover them with a cloth and let them rest for another 5–10 minutes.
💡 This short second rest makes the dough more relaxed and easier to roll thinly without springing back.
🔥 Let The Sizzle Of Dough In A Hot Pan Signal That Fresh Bread Is Only Moments Away
Step 7: Roll Into Thin Circles
On a lightly floured surface, roll each disc into a thin circle about 15–18 cm (6–7 inches) wide, keeping the thickness as even as possible from centre to edge.
💡 Even thickness is crucial; if some areas are thicker than others, the steam will not distribute evenly and the pita may puff only in patches or not at all.
Step 8: Heat The Pan Properly
Place a dry, heavy‑based pan over medium‑high heat and allow it to become thoroughly hot before adding the first piece of dough.
💡 A well‑heated pan is one of the main secrets to a good pocket; high heat creates a burst of steam that separates the layers and inflates the pita.
🥙 Keep A Stack Of Warm Pitas Under A Towel And Watch Them Disappear One By One At The Table
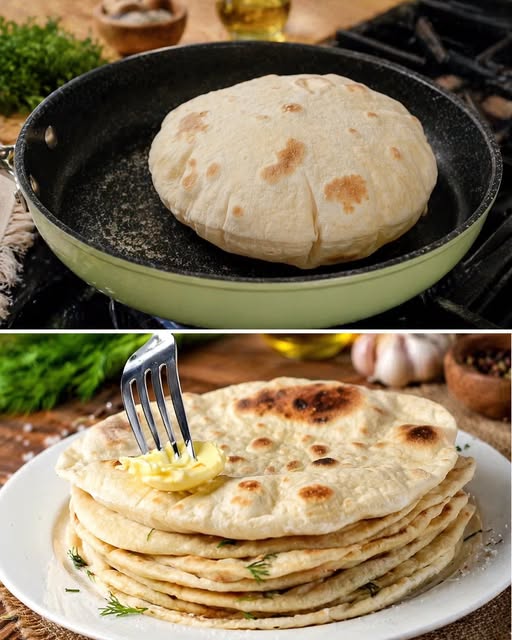
Step 9: Cook And Puff The Pitas
Lay one rolled circle of dough into the hot pan and cook for about 1–2 minutes until bubbles appear on the surface and light golden spots form underneath, then flip and cook the other side until the pita puffs and the pocket forms.
💡 If the pita is slow to puff, you can gently press around the edges with a spatula to encourage the steam to move and inflate the centre.
Step 10: Stack And Keep Warm
Transfer the cooked pita to a plate, stack each new one on top and cover the pile with a clean towel to keep them warm and soft until serving.
💡 Trapping a little steam under the towel keeps the pitas pliable, which makes them easier to open, fold and fill without cracking.
🌿 Use These Pitas As A Canvas For Wraps, Mezze Platters, Breakfast Sandwiches And More
🛒 Ingredients
For The Pita Dough
• 🌾 360 g all‑purpose flour (about 3 cups)
• 🧂 1 teaspoon salt
• 🛢️ 2 tablespoons vegetable oil
• 💧 200 ml warm water (about 3/4 cup + 1 tablespoon)
🥙 Enjoy The Gentle Chew And Soft Crumb Of Bread Made With Your Own Hands
🍽️ Kitchen Tools and 🛠️ Equipment Needed 🔪
• 🥣 Large Mixing Bowl — to combine the flour, salt, oil and water into a dough
• 🥄 Measuring Spoons — to measure the salt and oil accurately
• 🥛 Measuring Jug — to measure the warm water precisely
• 🥄 Wooden Spoon Or Dough Scraper — to bring the dough together before kneading
• 👐 Clean Work Surface Or Pastry Board — for kneading and shaping the dough
• 🔪 Bench Scraper Or Knife — to divide the dough into equal portions
• 🍳 Heavy‑Based Frying Pan Or Skillet — to cook the pitas and help them puff properly
• 🧻 Clean Kitchen Towel — to cover the cooked pitas and keep them warm and soft
🔥 Choose This Recipe When You Want Fresh Bread But Do Not Want To Switch On The Oven
❓ FAQ
- Do these pitas really puff without yeast?
Yes, the combination of well‑rested dough, thin rolling and high heat creates steam that inflates the bread and forms the pocket. - How warm should the water be?
The water should feel warm to the touch, similar to a comfortable bath, not hot or boiling. - Why did my pitas not puff properly?
Uneven rolling, a pan that is not hot enough or dough that has not rested long enough can all prevent full puffing. - Can I use wholemeal flour instead of all‑purpose flour?
You can replace part of the flour with wholemeal, but using all wholemeal may make the pitas denser and less likely to puff. - Can I bake these in the oven instead of a pan?
You can bake them on a very hot baking tray or stone, but this recipe is designed specifically for pan cooking and gives excellent results there. - How do I open the pocket without tearing it?
Let the pita cool slightly, then gently cut along one edge with a sharp knife and ease it open with your fingers. - Can I make the dough ahead of time?
You can mix and knead the dough, let it rest, then refrigerate it for a few hours, bringing it back to room temperature before rolling and cooking. - How should I store leftover pitas?
Once cool, store them in an airtight container or bag at room temperature for a day or two, or freeze for longer storage. - How can I reheat pitas without drying them out?
Reheat briefly in a hot pan or wrapped in foil in a warm oven until soft and warm again. - Can I flavour the dough with herbs or spices?
Yes, you can add dried herbs or a pinch of spices to the flour for extra flavour without affecting the texture.
🍽️ Impress Guests With Pitas That Balloon In The Pan And Open Cleanly For Filling
👨🍳 CHEF’S BEST TIPS
💡 Resting the dough is just as important as kneading; it allows the gluten to relax and helps the pitas puff.
💡 Roll each circle evenly and fairly thin; thick spots will stay heavy and prevent a full pocket from forming.
💡 Heat the pan thoroughly before cooking the first pita and keep the heat fairly high throughout the batch.
💡 Cook one pita at a time if your pan is small so each bread gets enough direct heat to puff properly.
💡 Do not oil the pan; a dry, hot surface encourages better puffing and cleaner golden spots.
💡 Stack the cooked pitas and cover them immediately to keep them soft and flexible.
💡 If a pita does not puff fully, it will still be delicious; use it as a flatbread for dipping or wrapping.
💡 Use a light hand with extra flour when rolling; too much flour on the surface can scorch in the pan.
💡 For very neat pockets, allow the pitas to cool slightly before cutting them open.
💡 Serve them warm whenever possible, as the texture is at its best when freshly cooked.
🥙 Make These Pitas Part Of Your Weekly Routine For Quick, Homemade Wrap Nights
These three‑ingredient pan‑puffed pitas show just how much you can achieve with a bowl, a pan and a little patience. Each bread that rises and balloons in the pan feels like a small victory, especially if you are new to making flatbreads at home. The texture is soft yet resilient, ready to cradle fillings or scoop up dips without falling apart. As you stack the warm pitas under a towel, the gentle steam keeps them tender and inviting, turning a simple meal into something that feels generous and abundant. This recipe fits easily into everyday cooking, whether you are preparing a quick wrap for lunch or building a mezze platter for friends. The rhythm of mixing, kneading, resting and cooking becomes pleasantly familiar, almost meditative, once you have made them a few times. Knowing that you can create proper pocket bread without yeast or an oven is empowering and quietly exciting. Let these pitas become part of your regular kitchen repertoire, ready whenever you want fresh bread that feels honest and homemade. May each batch bring warmth, ease and a sense of pride to your table. 🥙✨
🌿 Let Each Pocket Hold Colourful Vegetables, Sauces And Proteins For Balanced, Satisfying Meals
📦 SHORT RECIPE
Ingredients:
360 g all‑purpose flour (about 3 cups), 1 teaspoon salt, 2 tablespoons vegetable oil, 200 ml warm water (about 3/4 cup + 1 tablespoon)
Instructions:
In a large bowl, mix flour and salt.
Add vegetable oil and warm water, then mix until a dough forms.
Knead for 8–10 minutes until soft and smooth.
Cover and let the dough rest for 30–40 minutes.
Divide into 8 equal pieces, shape into balls and flatten slightly.
Roll each piece into a thin circle about 6–7 inches wide.
Heat a dry pan over medium‑high heat.
Cook each pita for 1–2 minutes until bubbles form, then flip and cook until puffed and golden.
Stack cooked pitas and cover with a towel to keep them soft.
Nutrition: ~190 kcal per pita (8 pitas).
🔥 Enjoy The Contrast Between The Lightly Charred Spots Outside And The Soft Interior Within
Pan‑Puffed Pocket Pita
Instructions
- In a large bowl, mix flour and salt.
- Add vegetable oil and warm water, then mix until a dough forms.
- Knead for 8–10 minutes until soft and smooth.
- Cover and let the dough rest for 30–40 minutes.
- Divide into 8 equal pieces, shape into balls and flatten slightly.
- Roll each piece into a thin circle about 6–7 inches wide.
- Heat a dry pan over medium‑high heat.
- Cook each pita for 1–2 minutes until bubbles form, then flip and cook until puffed and golden.
- Stack cooked pitas and cover with a towel to keep them soft.