This post may contain affiliate links. Read my Privacy policy.
If you want a simple homemade bread that is soft, savory, and naturally high in protein, this recipe is one of the easiest places to start. There is no flour, no kneading, and no complicated technique. The white beans give the bread structure and moisture, while the eggs help it rise and hold together. The result is a tender loaf that slices beautifully and works well for breakfast, snacks, or as a side with soups and salads.
What I like most about this recipe is that it is forgiving. Even if you are a beginner, you can make it successfully as long as you pay attention to a few small details. I will walk you through every step the way I would explain it in a real kitchen.
Before You Start: A Few Important Notes
You can use cooked white beans such as cannellini beans, navy beans, or great northern beans. If you are using canned beans, drain them well and rinse them under cold water. This removes excess salt and any canned flavor.
The texture of the batter matters more than people think. If the beans are too wet, the bread can become heavy and slightly gummy. So after rinsing the beans, let them sit in a sieve or colander for a few minutes. You can even pat them gently with paper towels if they seem very wet.
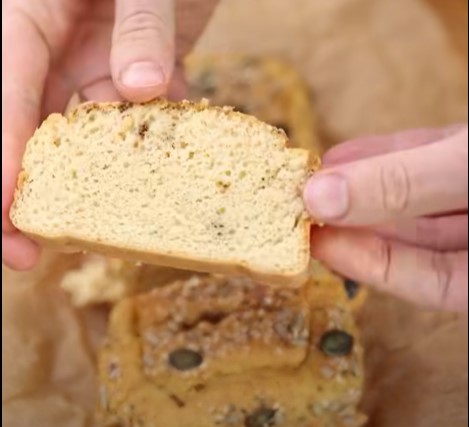
Also, this is not a traditional airy sandwich loaf. Think of it more as a soft, savory protein bread with a tender crumb. It should be moist, but not raw or dense.
Equipment
- Blender or food processor
- Loaf pan or small baking dish
- Parchment paper
- Mixing spatula
- Oven
Detailed Step-by-Step Method
Step 1: Preheat the oven properly
Preheat your oven to 350°F (180°C).
This step may sound basic, but it matters a lot. Your batter contains baking powder, and baking powder starts working as soon as it is mixed with wet ingredients. If the oven is not fully hot when the batter goes in, the bread may not rise as well and can bake up dense.
Chef’s tip:
Give the oven a full 10–15 minutes to heat properly, even if it beeps earlier. Many ovens say they are ready before they truly are.
Step 2: Prepare your baking pan
Line a loaf pan or small baking dish with parchment paper. Make sure the paper comes slightly up the sides so you can lift the bread out easily later.
If you do not have parchment paper, lightly grease the pan with oil, but parchment is much safer for beginners because this bread is soft and can stick.
Chef’s secret:
A light brushing of oil underneath the parchment helps it stay in place and not slide around when you pour in the batter.
Step 3: Prepare the beans correctly
Measure 300 g of white beans. If they are canned, drain and rinse them very well. Then let them sit for a few minutes to remove as much extra water as possible.
This is one of the most overlooked details. Too much moisture in the beans can make the batter loose, and then the bread may need longer baking time or may stay wet in the center.
Helpful beginner trick:
If the beans still look glossy and wet after rinsing, spread them on a plate lined with paper towel for 5 minutes before blending.
Step 4: Add everything to the blender
Place the white beans into the blender, then add:
- eggs
- baking powder
- oil
- Salt
- Black pepper
- Garlic powder
Start with moderate seasoning. You can always increase it next time, but too much salt or garlic can overpower the loaf.
A good starting point would be:
- 1/2 to 3/4 tsp salt
- 1/4 tsp black pepper
- 1/2 tsp garlic powder
Step 5: Blend until completely smooth
Blend the mixture until it becomes smooth, thick, and creamy. Stop the blender once or twice and scrape down the sides if needed.
This step is very important. If the beans are not blended well, the bread can have little bits of skin and a rough texture. You want the batter to look almost like a thick cake batter or hummus-like mixture, but slightly looser.
What you are looking for:
- No visible whole beans
- No large lumps
- Smooth, even texture
- Thick but pourable consistency
Chef’s tip:
Do not add extra liquid unless absolutely necessary. The batter should be thick. A batter that is too thin usually leads to flatter bread.
Step 6: Taste the seasoning mentally, not literally
Because the batter contains raw eggs, do not taste it directly. Instead, think about the balance of flavors before you bake. Beans are mild, so they need enough seasoning to avoid tasting bland.
If you enjoy a more savory loaf, this is the moment to add a little more garlic powder or black pepper.
Chef’s secret:
Savory breads almost always taste milder after baking than you expect. Slightly stronger seasoning in the batter often gives the best final result.
Step 7: Pour the batter into the pan
Pour the blended batter into your prepared loaf pan or baking dish. Use a spatula to scrape out every bit from the blender and spread the top evenly.
Try to level the surface so it bakes evenly. If one side is much thicker than the other, the loaf may rise unevenly.
Beginner-friendly trick:
Tap the pan lightly on the counter 2–3 times. This helps remove large air pockets and smooth the top.
Step 8: Bake slowly and do not rush
Place the pan in the preheated oven and bake for 40 to 45 minutes.
Do not open the oven too early. In the first 30 minutes, the bread is setting its structure. If you open the door often, the temperature drops and the loaf may sink slightly in the middle.
At around 40 minutes, check for doneness.
The bread is ready when:
- The top looks lightly golden
- The center feels set, not wet or jiggly
- A toothpick inserted into the middle comes out mostly clean, with perhaps a few moist crumbs but no raw batter
If the center still looks undercooked, bake for another 5 minutes and check again.
Chef’s note:
Every oven behaves a little differently. Some run hot, some run cool. The exact time is less important than the visual signs.
Step 9: Let it rest before slicing
Once baked, remove the bread from the oven and let it cool in the pan for about 10 to 15 minutes. Then lift it out using the parchment paper and place it on a rack or board.
Do not slice it immediately. This bread continues to set as it cools. If you cut it while it is very hot, the inside may seem softer than it really is and the slices can break apart.
Chef’s secret:
Warm bread smells irresistible, but patience gives you cleaner slices and a better final texture.
Step 10: Slice and serve
When the bread has cooled slightly, slice it with a sharp knife. Use gentle sawing motions rather than pressing straight down, because soft breads can compress if handled roughly.
Serve it warm or at room temperature.
It is delicious:
- on its own
- with soft cheese or cottage cheese
- with avocado
- alongside soup
- toasted lightly the next day
Texture and Flavor: What to Expect
This bread is soft, moist, and savory. It is not crusty like bakery bread, and it does not have the chewy texture of wheat bread. Because it is made with beans and eggs, it has a more tender, protein-rich crumb.
That is exactly what makes it useful: it is filling, nutritious, and easy to prepare.
Chef’s Best Tips for Success
1. Dry the beans well
This is one of the biggest secrets to getting a better loaf. Too much moisture is the main reason flourless breads turn dense or wet inside.
2. Blend longer than you think
A silky batter gives a much better texture. An extra 20–30 seconds of blending can make a noticeable difference.
3. Do not under-season
Beans need help in the flavor department. Salt, pepper, and garlic powder are simple, but they make the bread much more enjoyable.
4. Use parchment paper
It saves frustration. Soft breads can stick badly, especially when warm.
5. Cool before cutting
This is the difference between neat slices and a crumbly mess.
Easy Flavor Variations
Once you are comfortable with the basic version, you can improve the flavor in many ways.
Try adding:
- dried herbs such as oregano or Italian seasoning
- a little onion powder
- grated cheese for a richer savory loaf
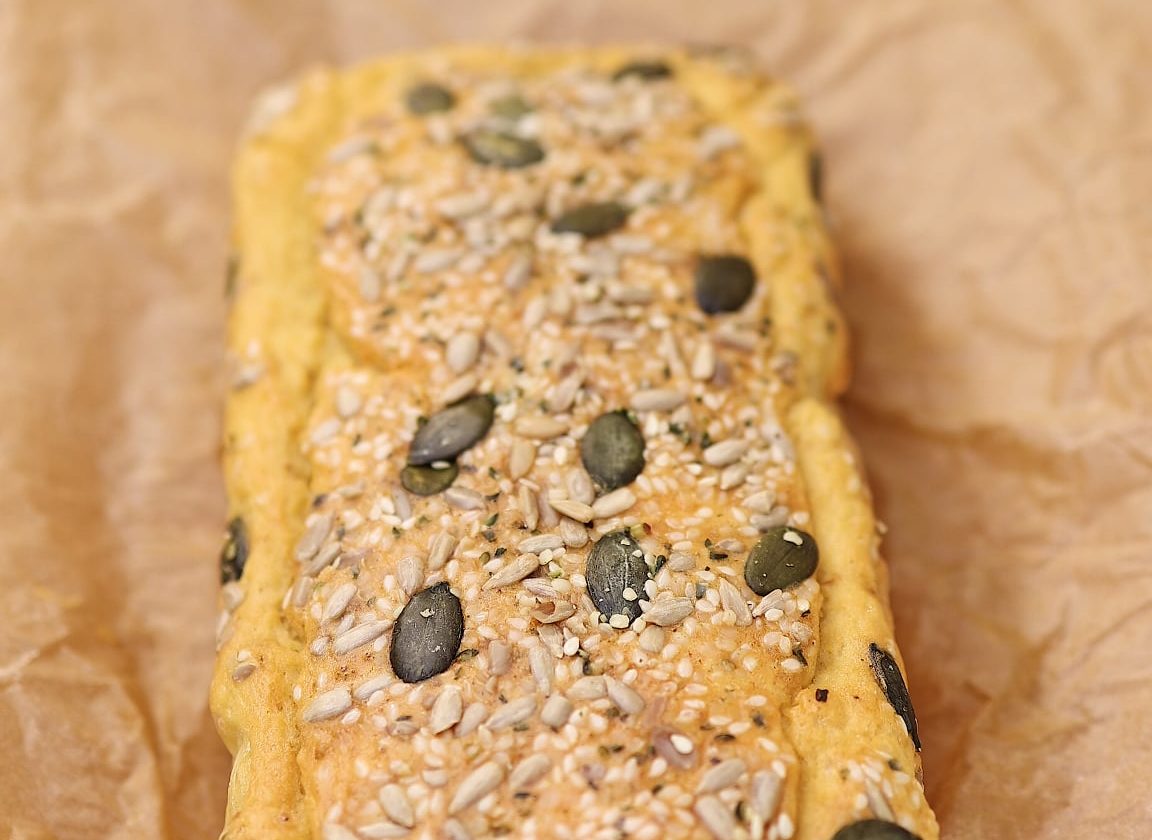
- sesame or sunflower seeds on top
- chopped fresh herbs like parsley or dill
Chef’s advice:
Change only one or two things at a time if you are a beginner. That way, you learn what really improves the bread and what changes the texture too much.
Common Mistakes and How to Avoid Them
The bread is too wet inside
This usually means the beans were too wet or the loaf needed a few more minutes in the oven.
The bread tastes bland
Add a little more salt, garlic powder, or pepper next time. Beans have a very mild flavor and need seasoning.
The loaf is dense
This can happen if the batter was not blended enough or if the baking powder was old. Always check that your baking powder is fresh.
The bread falls apart
Let it cool longer before slicing. Warm flourless breads are always more delicate.
Storage Tips
Store the bread in an airtight container in the refrigerator for up to 3 days. Because it contains eggs and has a moist texture, refrigeration is the safest option.
You can also slice it and reheat it lightly in a toaster or dry pan before serving.
Chef’s secret:
This bread often tastes even better on the second day because the flavor settles and the texture becomes a little firmer.
Final Thoughts
This high-protein flourless bread is a wonderful recipe for beginners because it is simple, practical, and made from everyday ingredients. It proves that healthy baking does not need to be complicated. Follow the method carefully, pay attention to moisture and baking time, and you will get a soft, flavorful loaf that feels satisfying and homemade.
High-Protein Flourless Bread
Instructions
- Preheat your oven to 350°F (180°C) and line a loaf pan with parchment paper.
- Drain and rinse the white beans well, then let them sit for a few minutes to remove excess moisture.
- Add the beans, eggs, baking powder, oil, salt, black pepper, and garlic powder to a blender or food processor.
- Blend the mixture until it becomes smooth, thick, and creamy, scraping the sides if necessary.
- Pour the batter into the prepared loaf pan and spread the top evenly with a spatula.
- Bake for 40–45 minutes until the top is lightly golden and the center is fully set.
- Remove from the oven and let the bread cool for 10–15 minutes, then slice and serve.
Nutrition
This post may contain affiliate links. Read my Privacy policy.