Soft, Cheesy, Crispy Flatbread Ready in Minutes
If you love easy homemade baking but do not want to deal with yeast, kneading, or complicated dough, this Greek Yogurt Flatbread is one of the smartest recipes you can make. It is soft and tender inside, beautifully cheesy in the middle, and lightly golden on top. The oats give it body, the Greek yogurt keeps it moist, and the mozzarella creates that irresistible cheesy layer that makes every bite satisfying.
This is the kind of recipe I recommend to beginners because it is forgiving, fast, and made with simple ingredients. If you can stir ingredients in a bowl, you can make this flatbread successfully.
Why You Will Love This Recipe
- No yeast
- No kneading
- Simple everyday ingredients
- High in protein compared with regular flatbread
- Crispy outside, soft inside
- Perfect as a snack, light lunch, or savory breakfast
Equipment
- Medium mixing bowl
- Spoon or spatula
- Baking tray or small sheet pan
- Parchment paper
- Measuring cups and spoons
- Oven
Detailed Step-by-Step Instructions
Step 1: Soften the oats with the yogurt
Place the oats and Greek yogurt in a medium bowl. Stir them together until all the oats are coated. Let this mixture rest for about 10 minutes.
Why this matters:
This short resting time softens the oats and helps them absorb moisture. If you skip this step, the texture may feel rougher and less cohesive after baking.
Chef’s secret:
If you want a smoother, more bread-like texture, pulse the oats in a blender or food processor for a few seconds before mixing. You do not need to make a fine flour — just break them down slightly.
Step 2: Add the eggs and seasonings
Crack the eggs into the bowl with the oat-yogurt mixture. Add salt, oregano, dried garlic, and baking powder. Mix thoroughly until the batter becomes even and well combined.
You are looking for a thick batter, not a pourable liquid. It should spread with a spoon or spatula.
What beginners should know:
Do not worry if the batter looks thicker than pancake batter. That is exactly what you want. A batter that is too thin will spread too much and may not hold the cheesy center properly.
Chef’s secret:
Mix until everything is evenly combined, but do not overwork it. Once the ingredients are incorporated, stop. Overmixing will not ruin it, but gentle mixing gives a better texture.
Step 3: Prepare the tray properly
Lightly mist your baking tray with water, then line it with parchment paper. After that, spray the parchment lightly with vegetable oil.
Why spray with water first:
The water helps the parchment stick to the tray so it does not slide around while you spread the batter.
Why spray the parchment too:
Even with parchment, this batter benefits from a light coating of oil. It helps the bottom release easily and encourages a better golden finish.
Chef’s secret:
Do not skip greasing the parchment. Low-fat batters like this one sometimes cling more than traditional doughs.
Step 4: Spread the first layer of batter
Spoon half of the batter onto the prepared tray and spread it into an even layer.
Try to keep the thickness consistent from edge to edge so it bakes evenly. A spatula or the back of a spoon works best for this.
Beginner tip:
If the batter sticks to the spoon, lightly oil the spoon or spatula. That makes spreading much easier.
Chef’s secret:
Do not make the layer too thin. If it is too thin, the mozzarella may leak out during baking. Aim for a sturdy base that can support the filling.
Step 5: Add the mozzarella filling
Sprinkle the mozzarella evenly over the first layer, leaving a small border around the edges.
Why leave a border:
Keeping a little space around the edge helps seal the cheese inside once you add the second layer of batter.
Chef’s secret:
Use low-moisture mozzarella if possible. Fresh mozzarella contains more water and may make the center slightly wet. If that is what you have, pat it dry first.
Step 6: Cover with the remaining batter
Carefully spoon the rest of the batter over the mozzarella layer. Spread it gently so the cheese is fully covered.
This part does not need to look perfect. Just make sure most of the cheese is enclosed.
Beginner tip:
Add the batter in small spoonfuls all over the top first, then spread it. This is much easier than dumping it all in one spot.
Chef’s secret:
Work gently here. If you press too hard, you may drag the cheese up into the top layer instead of sealing it inside.
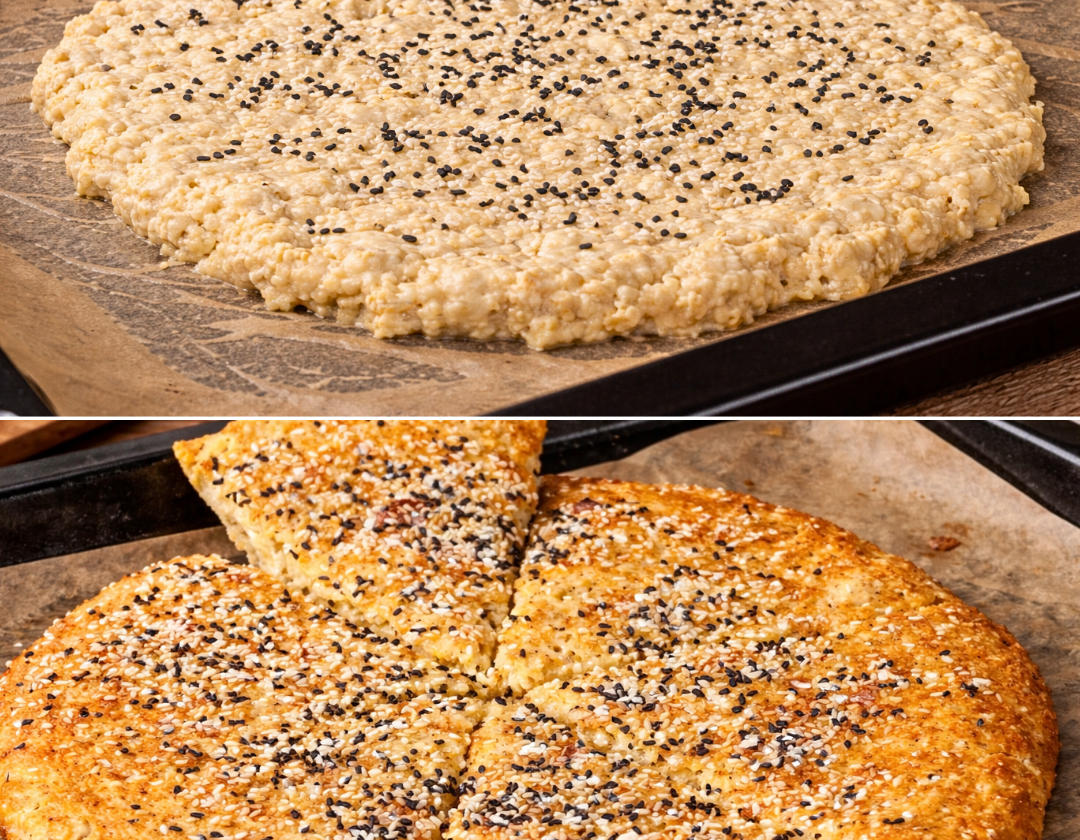
Step 7: Finish with sesame seeds
Sprinkle the sesame seeds evenly across the top.
Why this step matters:
Sesame seeds add a light nutty flavor and a beautiful bakery-style finish. They also make the flatbread look more appetizing.
Optional upgrade:
You can also add a little extra oregano on top for more aroma.
Step 8: Bake until golden and set
Bake in a preheated oven at 356°F (180°C) for 20 to 25 minutes, or until the top is golden and the center feels set.
Check it at the 20-minute mark. Every oven behaves a little differently, so use visual cues as much as time.
How to know it is ready:
- The top should look lightly golden
- The edges should look slightly firmer
- The center should not jiggle when the tray is gently moved
Chef’s secret:
If you want a deeper golden top, bake it for an extra 2 to 3 minutes at the end, but watch it closely.
Step 9: Let it rest before slicing
Once baked, remove it from the oven and let it rest for 5 to 10 minutes before slicing.
Why resting is important:
This gives the structure time to settle and allows the melted cheese to thicken slightly. If you cut it immediately, the center may be too loose.
Chef’s secret:
A short rest makes the difference between a flatbread that falls apart and one that slices neatly.
Texture and Flavor
This flatbread comes out lightly crisp on the outside, soft and tender inside, with a cheesy center that makes it feel far more indulgent than the ingredient list suggests. The oregano and garlic give it a pizza-style flavor, while the sesame seeds bring a delicate crunch.
Chef’s Best Tips
1. Use thick Greek yogurt
Thick Greek yogurt gives the batter structure. If your yogurt is very loose, the batter may become too wet.
2. Grind the oats for a smoother result
Whole oats work well, but slightly ground oats create a softer, more uniform crumb.
3. Do not skip the resting time
The oats need those 10 minutes to hydrate. That small step improves texture noticeably.
4. Use low-moisture mozzarella
This keeps the filling cheesy without making the flatbread soggy.
5. Spread the batter gently
Think of this as building layers, not kneading dough. Gentle spreading keeps the cheese in place.
6. Watch the center, not just the edges
The edges cook first. Make sure the middle is set before removing it from the oven.
7. Let it cool slightly before serving
It smells amazing straight from the oven, but a short rest makes it easier to cut and improves the texture.
Variations
Add herbs
Try parsley, basil, or Italian seasoning for extra flavor.
Make it spicier
Add chili flakes or a pinch of smoked paprika to the batter.
Add protein
A little chopped cooked chicken or turkey can make it more filling.
Add vegetables
Finely chopped spinach, roasted peppers, or sautéed mushrooms work well, but use them sparingly and avoid adding too much moisture.
Nutrition
Approximate nutrition per serving
Servings: 4
- Calories: 180
- Protein: 12 g
- Carbohydrates: 13 g
- Fat: 9 g
- Fiber: 2 g
- Sugar: 2 g
- Sodium: 260 mg
Nutrition values are approximate and can vary depending on the yogurt, mozzarella, and oats used.
FAQ
Can I use quick oats instead of regular oats?
Yes. Quick oats work very well and soften even faster. The texture may be slightly smoother.
Can I blend the oats into oat flour?
Yes. That is an excellent option if you want a more uniform, bread-like texture.
Can I use plain yogurt instead of Greek yogurt?
You can, but Greek yogurt is better because it is thicker. Regular yogurt may make the batter too loose unless you reduce it slightly or add a little more oats.
Can I make this ahead?
Yes. You can bake it ahead and keep it in the refrigerator for up to 3 days.
How do I reheat it?
Reheat in the oven or air fryer for the best texture. A microwave works too, but the outside will be softer.
Can I freeze it?
Yes. Let it cool completely, slice it, and freeze in an airtight container. Reheat from thawed for best texture.
Why is my flatbread wet in the middle?
This usually happens if the mozzarella had too much moisture, the batter was too thin, or the flatbread needed a few more minutes in the oven.
Can I make it without cheese?
Yes, but the cheese adds both flavor and structure in the middle. Without it, the result will feel more like a savory baked oat bread.
Serving Suggestions
Serve this flatbread:
- warm as a savory breakfast
- with a fresh salad for lunch
- as a snack with a yogurt or garlic dip
- instead of bread with soup
- as a healthier alternative to pizza-style baking

Greek Yogurt Flatbread
Instructions
- Mix oats and Greek yogurt in a bowl. Let sit for 10 minutes.
- Add eggs, salt, oregano, dried garlic, and baking powder. Mix until combined.
- Lightly spray a baking tray with water, line with parchment paper, and spray with oil.
- Spread half of the batter onto the tray.
- Add an even layer of mozzarella.
- Cover with the remaining batter.
- Sprinkle sesame seeds on top.
- Bake at 180°C (356°F) for 20 to 25 minutes, until golden and set.
- Rest for 5 to 10 minutes before slicing and serving.
Notes
- Use thick Greek yogurt for the best texture.
- Grind the oats slightly for a smoother crumb.
- Use low-moisture mozzarella to avoid excess moisture.
- Let the baked flatbread rest before slicing.