These little cheesecake cups are one of those recipes I recommend when you want something sweet, quick, and satisfying — without committing to a full dessert.
They’re soft, gently creamy, naturally light, and surprisingly rich in protein. With just a few simple ingredients, you get a dessert that feels indulgent but fits perfectly into a balanced lifestyle.
Let me guide you step by step so you get smooth, tender, perfectly set mini cheesecakes every time.
Enjoy High Protein Mini Cheesecake Cups That Feel Light, Creamy And Beautifully Satisfying
🧾 Ingredients (Makes 8)
- 300 g yogurt (thick, preferably Greek-style)
- 2 eggs (room temperature)
- 2 tbsp sweetener of choice
- 2 tbsp cornstarch or all-purpose flour
- A handful of chocolate chips or a few frozen raspberries
✨ Savour A Dessert Where Silky Texture Meets Clean, Balanced Ingredients
👨🍳 Step-by-Step Instructions
Step 1: Prepare your ingredients
Bring eggs to room temperature and ensure your yogurt is thick, not watery.
👉 If yogurt is too liquid, strain it for 10–15 minutes.
💡 This step is key to achieving a creamy, not runny texture.
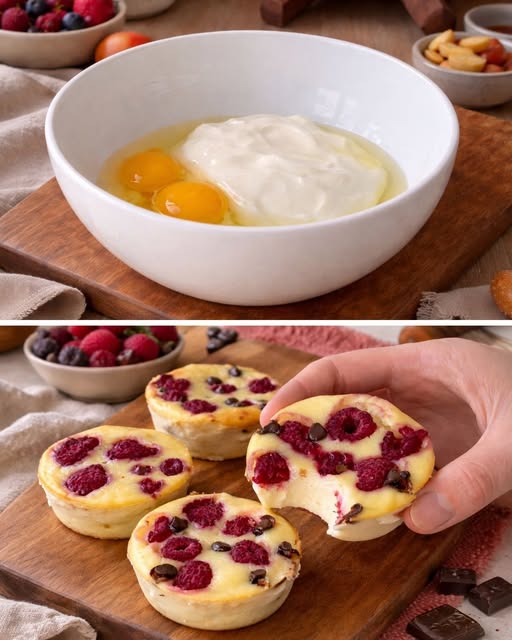
Step 2: Mix the base
In a bowl, whisk together:
- yogurt
- eggs
- sweetener
Mix until smooth and fully combined.
📌 Avoid vigorous whisking — you don’t want too many air bubbles.
🍓 Choose A Mini Cheesecake That Delivers Sweetness Without The Heavy Aftertaste
Step 3: Add structure
Add cornstarch (or flour) and mix until smooth.
👉 The batter should be silky and slightly thick.
💡 This ingredient stabilizes the cheesecake and gives it a soft, custard-like texture.
Step 4: Prepare the molds
Use silicone muffin cups or line a muffin tin with paper liners.
👉 Lightly grease if needed for easy removal.
🔥 Let Each Bite Bring You Gentle Freshness And A Smooth, Velvety Finish
Step 5: Fill and top
Divide the batter evenly into 8 cups.
Add:
- chocolate chips or
- frozen raspberries
📌 Do not overload — a few pieces per cup is enough.
Step 6: Bake gently
Bake at:
- 320°F (160°C)
- About 25 minutes
👉 The centers should be set but still slightly soft.
💡 Overbaking will make them dry instead of creamy.
🌿 Appreciate How Natural Protein Creates A Dessert That Feels Nourishing And Comforting
Step 7: Cool completely
Let them cool at room temperature.
📌 They will firm up as they cool — this is normal.
Step 8: Chill for best texture
Refrigerate for at least 2–3 hours before serving.
👉 This step transforms them into a smooth, cheesecake-like texture.
🍓 Serve Them Chilled And Enjoy A Perfectly Set, Delicate Creaminess
Step 9: Serve
Remove from molds and serve chilled.
Perfect as a snack, dessert, or meal-prep treat.
🍓✨ High-Protein Mini Cheesecake Cups
📌 Chef’s Best Tips
- Use thick yogurt for best consistency
- Strain yogurt if it’s watery
- Do not overmix — keep texture smooth
- Bake on middle rack for even heat
- Slight jiggle in center = perfect doneness
- Chill before eating — essential step
- Add vanilla or lemon zest for extra flavor
- Use silicone molds for easiest removal
- Clean edges after baking for a neat look
- Store in fridge — they improve overnight
✨ Keep This Recipe Close For Moments When You Want Something Sweet Yet Light
❓ FAQ
Can I use regular yogurt?
Yes, but strain it first to remove excess liquid.
Can I replace cornstarch?
Yes, with flour or even a small amount of pudding mix.
Why are my cups too soft?
They need more chilling time or slightly longer baking.
Can I freeze them?
Yes, but texture may become slightly denser.
How long do they last?
Up to 3 days in the refrigerator.
🔥 Enjoy A Dessert That Fits Your Goals Without Sacrificing Flavour
🥗 Nutrition (Approx. per cup)
- Calories: ~60–75 kcal
- Protein: 4–6 g
- Carbohydrates: 5–7 g
- Fat: 2–3 g
🌿 Choose A Treat That Works For Breakfast, Snack Time Or A Calm Evening Moment
⚡ Short Step-by-Step
- Preheat oven to 320°F (160°C).
- Mix yogurt, eggs, sweetener.
- Add cornstarch and mix.
- Pour into muffin cups.
- Add chocolate chips or raspberries.
- Bake 25 minutes.
- Cool completely.
- Chill 2–3 hours.
- Serve.
Light, Creamy & Perfectly Portion-Controlled — The Easiest Sweet Treat
High-Protein Mini Cheesecake Cups
Instructions
- Preheat oven to 320°F (160°C).
- Mix yogurt, eggs, sweetener.
- Add cornstarch and mix.
- Pour into muffin cups.
- Add chocolate chips or raspberries.
- Bake 25 minutes.
- Cool completely.
- Chill 2–3 hours.
- Serve.


