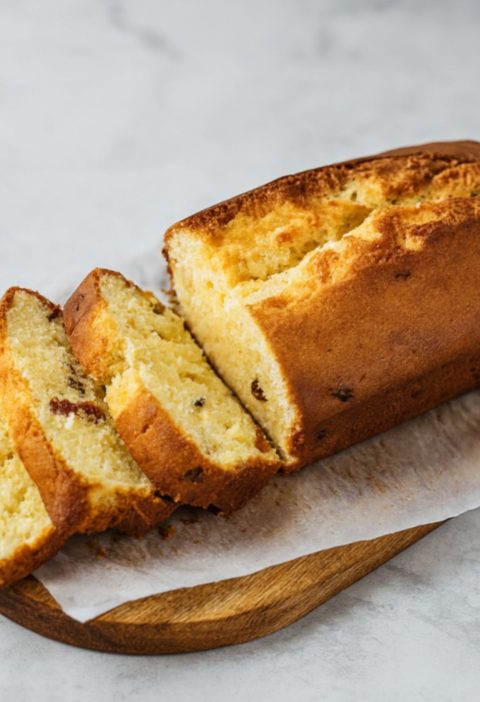
🥖 Golden, hearty, and unbelievably healthy — this Flourless Quinoa Bread will change how you feel about homemade baking.🍞
☕ It has the rustic charm of sourdough with none of the flour, yeast, or fuss. Each slice is tender inside, with a slightly crunchy edge and deep nutty flavour. Ready in just a few steps, it’s the kind of recipe that makes you feel like a kitchen magician. Whether you’re gluten-free or just love clean eating, this bread is a dream come true. The secret? Soaked quinoa that turns into a beautiful, wholesome base.
No flour, no gums, no baking powders — just real, honest ingredients.🥪
🌱 It toasts like a dream, holds together beautifully, and works for both sweet and savoury toppings. You won’t believe how satisfying it is until you try it fresh from the oven.🔥 Perfect for breakfast, brunch or an energising afternoon snack. One slice and you’ll be hooked for life — it’s that good!😍
You’ll never look at bread the same way again. Pair it with smashed avocado or a drizzle of honey — either way, it’s divine. Meal prep it once, and enjoy nourishing slices all week long. Let this be your go-to recipe when you want to bake without compromise.✨
🍞 Made entirely from soaked quinoa, this loaf feels more like alchemy than baking.
No flour, no gluten, no guilt — just wholesome ingredients that love your body back 💛 The crust is gently crisp, the inside moist and satisfying — every bite feels like a reward. This isn’t just for gluten-free diets; it’s for anyone who craves real food without compromise. No mixing bowls, no rising time, no drama — just blend, bake, and enjoy. It toasts like a dream, doesn’t crumble, and even holds up in a sandwich 🥪
☕ Meet the bread that’s quietly taking over clean kitchens everywhere
— flourless, fuss-free, and utterly irresistible🥖
🥪 Rich in texture and full of earthy flavour, it’s proof that simplicity can taste luxurious. Whether you top it with almond butter or soft goat cheese, it plays well with everything. It’s a game-changer for meal preppers and health-lovers alike. This loaf is a kitchen staple you didn’t know you needed.🏡 The best part? It’s freezer-friendly and loves a reheat as much as the first slice. Once you slice into it, the aroma alone will win you over. Make it on a Sunday and enjoy it all week — that’s smart baking. You’re about to experience bread on a whole new level 🌟
✅ ⏱ Quick Overview
- Prep Time: 10 minutes
- Cook Time: 1 hour
- Total Time: 1 hour 10 minutes
- Servings: 10 slices
- Difficulty: Easy
⭐ Why You’ll Love This Recipe
- 💚 100% flourless — no wheat, no gluten, no grainy substitutes
- 💥 Packed with fibre for gut health and improved digestion
- ⚡ Full of plant-based protein to support energy and muscles
- 🍞 Perfect texture: crisp on the outside, soft and moist inside
- 🧽 Easy to clean up — everything goes into the blender
- 🌱 Naturally vegan, gluten-free, and free from additives
- 🕒 Ideal for meal prep — stays fresh, freezes well, and versatile
📅 Nutrition Per Serving (entire recipe — yields 6 slices)
Calories: 210 kcal
Protein: 7.4g
Carbohydrates: 24.5g
Fibre: 3.1g
Fat: 10.3g
Sugar: 0.8g
Sodium: 110mg
Step-by-Step Instructions
Step 1: Rinse the quinoa very well
Place 170 g uncooked quinoa into a fine-mesh sieve. Rinse it under cold running water for at least 1–2 minutes, rubbing the grains gently with your fingers.
This step is very important. Quinoa has a natural coating called saponin, which can taste bitter and slightly soapy. If you skip proper rinsing, your bread may have an unpleasant aftertaste.
Chef’s secret:
Do not just splash the quinoa quickly with water. Let the water run through it properly. When the water looks mostly clear and the quinoa smells clean and mild, it is ready.
Step 2: Soak the quinoa overnight
Transfer the rinsed quinoa to a bowl and cover it with plenty of fresh water. The water should sit at least 3–4 cm above the quinoa, because the grains will absorb some liquid as they soak.
Leave it to soak overnight, ideally 8–12 hours.
Soaking softens the quinoa, making it much easier to blend into a smooth batter. It also improves the final texture of the bread and makes the quinoa gentler to digest.
Chef’s tip for beginners:
If your kitchen is very warm, soak the quinoa in the refrigerator. This prevents fermentation and keeps the flavor clean.
Step 3: Make the chia gel
In a small bowl, combine:
- 36 g chia seeds
- 45–60 ml water
Stir well and let the mixture sit for 1–2 hours, or until it becomes thick and gel-like.
Chia seeds absorb liquid and create a natural binder. In this recipe, they replace eggs and help hold the loaf together.
Chef’s secret:
Stir the chia mixture twice during the first 10 minutes. Chia seeds like to clump together, and stirring helps create an even gel.
Step 4: Drain the soaked quinoa properly
After soaking, pour the quinoa into a sieve and drain it very well. Let it sit in the sieve for a few minutes so excess water can run off.
This is one of the most important texture steps. Too much water in the batter can make the bread dense, wet, or gummy inside.
Chef’s tip:
After draining, gently shake the sieve. The quinoa should be moist but not dripping.
Step 5: Prepare the loaf tin
Line a small loaf tin with baking parchment. Leave some parchment hanging over the sides so you can lift the bread out easily after baking.
There is no need to grease the tin if you use parchment paper.
Chef’s secret:
Press the parchment firmly into the corners of the tin. This helps the loaf bake into a neat shape.
Step 6: Blend the batter
Add the drained quinoa to a high-speed blender with:
- Prepared chia gel
- 60 ml water
- 30 ml extra virgin olive oil
- 5 g baking powder
- ¾–1 tsp fine sea salt
- Optional spices: garlic powder, cumin, smoked paprika
Blend on high until the mixture becomes thick, creamy, and mostly smooth. It should look similar to a thick cake batter.
You may need to stop the blender and scrape down the sides with a spatula.
Chef’s tip for beginners:
Do not worry if the batter is not perfectly silky. A little texture is fine. However, large whole quinoa grains should not remain, because they can make the bread crumbly.
Texture check:
The batter should be pourable but thick. If it looks watery, the quinoa was probably not drained enough. If it looks too stiff for the blender to move, add 1 tablespoon of water at a time, but be careful not to overdo it.
Step 7: Pour the batter into the tin
Pour the batter into the prepared loaf tin. Use a spatula to smooth the top.
Tap the tin gently on the countertop 2–3 times. This helps remove large air pockets and gives the bread a more even crumb.
Chef’s secret:
Smooth the surface with a slightly wet spatula. This helps create a cleaner, more even top.
Step 8: Add toppings
Sprinkle the top with sunflower seeds, sesame seeds, flax seeds, or rolled oats.
Do not overload the top. A light layer is best. Too many toppings can make the crust heavy and may prevent the loaf from rising evenly.
Chef’s tip:
Gently press the seeds into the surface with your fingers so they stick during baking.
Step 9: Bake slowly
Preheat the oven to:
- 180°C conventional oven
- 160°C fan oven
Bake the bread for about 1 hour 20 minutes, or until the top is golden and the loaf feels firm.
Do not open the oven during the first hour. This bread needs steady heat to set properly.
The bread is ready when:
- The top is golden brown
- The edges look slightly pulled away from the parchment
- The loaf feels firm when gently pressed
- A skewer inserted into the center comes out mostly clean
- The internal texture is set, not wet
Chef’s secret:
If the top browns too quickly, loosely cover the loaf with foil for the last 15–20 minutes of baking.
Step 10: Cool completely before slicing
Remove the loaf from the oven and let it cool in the tin for 20–30 minutes. Then lift it out using the parchment paper and transfer it to a cooling rack.
Let the bread cool completely before slicing.
This step is not optional. The bread continues to firm up as it cools. If you cut it too early, the inside may seem gummy even if it is fully baked.
Chef’s tip:
For the cleanest slices, let the loaf rest for at least 2 hours before cutting.
Step 11: Slice and serve
Use a serrated knife to slice the bread.
This bread is delicious:
- Toasted with olive oil
- Served with avocado
- Topped with hummus
- Paired with soup
- Used for open-faced sandwiches
- Served with eggs, cheese, or roasted vegetables
Chef’s secret:
Toasting brings out the natural nutty flavor of quinoa and improves the texture beautifully.
Storage Instructions
At room temperature
Store the bread wrapped in a clean kitchen towel for up to 1 day.
In the refrigerator
Store in an airtight container for 4–5 days.
In the freezer
Slice the loaf first, then freeze the slices with parchment between them. Store for up to 2 months.
Toast slices directly from frozen.
Nutrition
Approximate nutrition per slice, based on 10 slices per loaf.
| Nutrition | Per Slice |
|---|---|
| Calories | 120–135 kcal |
| Carbohydrates | 16–18 g |
| Protein | 4–5 g |
| Fat | 5–6 g |
| Fiber | 3–4 g |
| Sugar | less than 1 g |
| Sodium | depends on salt used |
Note: Nutrition values are approximate and may vary depending on toppings, salt amount, and exact ingredient brands.
Chef’s Best Tips
1. Rinse the quinoa thoroughly
This is the difference between a pleasant nutty flavor and a bitter loaf. Rinse until the water runs almost clear.
2. Do not skip soaking
Dry quinoa will not blend properly and can make the bread gritty. Overnight soaking gives the best texture.
3. Drain very well
A wet batter creates a gummy loaf. After soaking, let the quinoa sit in the sieve for a few minutes.
4. Use a strong blender
The smoother the batter, the more bread-like the texture. A weak blender may leave too many whole grains.
5. Keep the loaf small
This bread is dense and moist by nature. A small loaf tin helps it bake through properly.
6. Bake patiently
This is not a quick bread that should be rushed. It needs slow, steady baking so the center can set.
7. Cool completely
Warm quinoa bread can seem underbaked even when it is not. Cooling allows the crumb to firm up.
8. Toast before serving
Fresh slices are good, but toasted slices are even better. Toasting improves both flavor and structure.
FAQ
Is this quinoa bread gluten-free?
Yes. Quinoa is naturally gluten-free. However, make sure your baking powder and toppings are certified gluten-free if you are baking for someone with celiac disease or strong gluten sensitivity.
Can I use red or black quinoa?
Yes, but white quinoa gives the softest texture and mildest flavor. Red or black quinoa will make the loaf darker, earthier, and slightly more rustic.
Can I make this without chia seeds?
Chia seeds are important because they bind the bread. You can try ground flaxseed instead, using the same amount, but the texture may be slightly different.
Why is my bread gummy inside?
The most common reasons are:
- The quinoa was not drained well
- Too much water was added
- The loaf was sliced while still warm
- The bread needed more baking time
- The loaf tin was too large or too deep
Can I add herbs?
Yes. Fresh rosemary, thyme, oregano, or parsley work well. Use about 1–2 tablespoons chopped fresh herbs or 1 teaspoon dried herbs.
Can I make it oil-free?
You can replace the olive oil with water, but the bread will be slightly drier and less tender. Olive oil improves flavor and texture.
Can I use cooked quinoa?
No. This recipe is designed for soaked uncooked quinoa. Cooked quinoa contains too much moisture and will not create the same batter.
Can I double the recipe?
Yes, but it is better to bake two small loaves rather than one large loaf. A large loaf may stay wet in the center.
How do I know when it is fully baked?
The loaf should feel firm, the top should be golden, and a skewer inserted into the center should come out without wet batter. If unsure, bake for another 10 minutes.🥑

Flourless Quinoa Bread
Instructions
- Rinse the quinoa very well under cold running water, then soak overnight in fresh water.
- Mix chia seeds with 45–60 ml water and let sit for 1–2 hours until thick and gel-like.
- Drain the soaked quinoa thoroughly.
- Preheat oven to 180°C conventional or 160°C fan. Line a small loaf tin with parchment paper.
- Add drained quinoa, chia gel, 60 ml water, olive oil, baking powder, salt, and spices to a blender.
- Blend until thick, smooth, and creamy.
- Pour the batter into the prepared loaf tin and smooth the top.
- Sprinkle with seeds or oats if desired.
- Bake for 1 hour 20 minutes, or until golden, firm, and fully set.
- Cool completely before slicing. Serve fresh or toasted.
Notes
- Drain the quinoa well to avoid a gummy loaf.
- Do not open the oven during the first hour of baking.
- Cool fully before slicing for the best texture.
- Store in the refrigerator for 4–5 days or freeze sliced for up to 2 months.
🍞 This is not just bread — it’s a revelation. Once you make this quinoa loaf, store-bought bread may never compare again. There’s something deeply satisfying about baking with pure, whole ingredients.
It’s bread-making stripped down to the essentials — and it still delivers magic. Each bite is nourishing, honest, and full of texture. You’ll love how beautifully it fits into your everyday meals. From morning toast to a hearty lunch, it never disappoints. And knowing there’s no flour or additives makes every bite feel even better. This is wellness in bread form, baked with intention.💛
🍃 No need to choose between flavour and wellness – this one has both 💯
☕ It’s a staple that works harder than most bakery loaves. It invites creativity — savoury toppings, sweet spreads, or just as it is. Once cooled and sliced, you’ll find yourself reaching for it again and again. It’s simple, strong and soulful — just what bread should be. Your kitchen will smell like comfort, and your body will thank you. One recipe, infinite possibilities — welcome to better bread. 🥪
🥖 This quinoa bread isn’t just an alternative — it’s a revelation. Each slice feels like a quiet celebration of simplicity and nourishment. It’s the kind of recipe you’ll come back to again and again, because it just works. Whether it’s part of your wellness journey or just curiosity, you’ll be glad you tried it. There’s comfort in knowing every ingredient in your bread — no labels, no confusion. It’s fuel, it’s flavour, it’s food with a purpose Serve it to guests and watch their surprise when you tell them it’s flourless. It’s ideal for slow mornings, quick lunches, or light dinners with soup.🌱
🍵 No compromise, no gimmicks — just wholesome, honest baking. It’s the kind of recipe that gives more than it takes. And the confidence you gain from baking your own bread is a little addictive. When your kitchen smells this good, you’ll want to share it with everyone. Healthy doesn’t mean bland — and this recipe proves it. One loaf at a time, you’re building habits that feel as good as they taste. So preheat that oven, and let the magic begin.✨