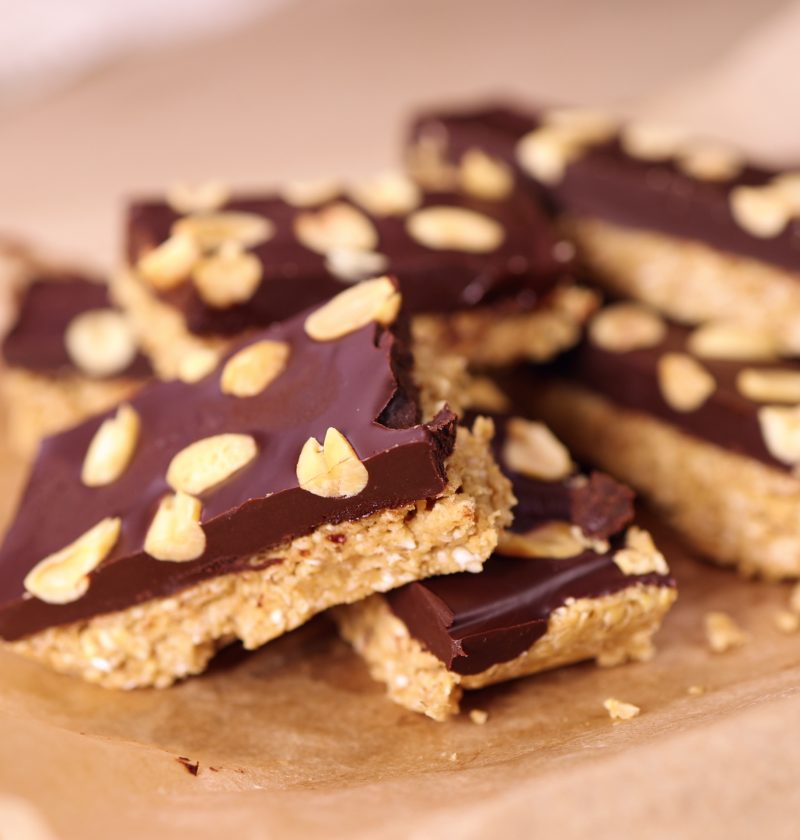
These rich chocolate peanut butter bars are made without flour, eggs, dairy or refined sugar. They require only about 5 minutes of active preparation, although you will need additional chilling time for the layers to become firm.
The base is satisfyingly chewy, while the dark chocolate topping becomes smooth and creamy thanks to an extra spoonful of peanut butter. This is an excellent beginner-friendly dessert because there is no oven, no complicated equipment and very little that can go wrong.
Equipment
- 20 × 20 cm square tin
- Baking parchment
- Medium mixing bowl
- Flexible spatula or wooden spoon
- Heatproof bowl
- Small saucepan or microwave
- Sharp knife
Detailed Step-by-Step Instructions
Step 1: Prepare the Tin
Line a 20 × 20 cm square tin with baking parchment. Allow the paper to extend above two opposite sides of the tin. These parchment “handles” will help you lift out the chilled dessert without damaging it.
You do not usually need to grease the tin. However, if the parchment keeps moving, apply a tiny amount of coconut oil underneath it to hold it in place.
Chef’s tip: A smaller tin will create thicker, softer bars. A larger tin will produce thinner bars that set more quickly.
Step 2: Check the Peanut Butter
Use smooth, creamy peanut butter for the easiest mixing. If you are using natural peanut butter and the oil has separated, stir it thoroughly in the jar before measuring.
Place 120 g peanut butter in a medium mixing bowl. If it is very firm, warm it for 10–15 seconds in the microwave or place the bowl over warm water. It should be soft enough to stir but not hot.
Chef’s secret: The consistency of peanut butter varies between brands. A runny natural peanut butter may require a few more oats, while a thick peanut butter may need a little extra maple syrup.
Step 3: Combine the Wet Ingredients
Add the maple syrup and melted coconut oil to the peanut butter. Stir until the mixture is completely smooth, glossy and uniform.
There should be no visible streaks of oil. Combining the wet ingredients first makes it much easier to distribute them evenly through the oats.
Beginner’s tip: Allow the melted coconut oil to cool slightly before adding it. Very hot oil can make the mixture greasy and unnecessarily soften the peanut butter.
Step 4: Add the Oats
Add the rolled oats and mix thoroughly. Scrape along the bottom and sides of the bowl so that every oat is coated.
The mixture should be thick and slightly sticky. When squeezed in your hand, it should hold together instead of falling into dry crumbs.
If the mixture is too dry, add maple syrup one teaspoon at a time. If it is very soft or oily, add one tablespoon of oats at a time.
For a softer texture: Blend half of the oats into coarse oat flour before mixing. This creates a more cohesive, almost cookie-dough-like base.
Step 5: Press the Base into the Tin
Transfer the mixture to the lined tin. Spread it roughly with a spatula, then press it down very firmly and evenly.
Pay special attention to the corners and edges. A loosely packed base will crumble when sliced, so compacting it properly is one of the most important steps.
You can use:
- The flat bottom of a drinking glass
- The base of a measuring cup
- A spatula covered with a small piece of parchment
Chef’s secret: Place parchment over the mixture before pressing it. This prevents sticking and helps create a smooth, level surface for the chocolate layer.
Step 6: Chill the Base
Refrigerate the base for 30 minutes.
During this time, the coconut oil and peanut butter will firm up, binding the oats together. The base should feel cool and solid before you add the warm topping.
Do not skip this stage. If the base is soft, the chocolate topping may mix into it instead of forming a separate layer.
Step 7: Prepare the Chocolate Topping
Place the chopped dark chocolate and 48 g peanut butter in a dry, heatproof bowl.
Microwave method
Heat for 20 seconds at a time, stirring thoroughly after every interval. Stop when approximately 90% of the chocolate has melted. Continue stirring until the remaining pieces disappear.
Bain-marie method
Set the bowl over a saucepan containing a small amount of gently simmering water. The bottom of the bowl must not touch the water. Stir until the mixture is smooth, then remove it from the heat.
Chef’s warning: Even a small amount of water can cause melted chocolate to become thick and grainy. Make sure the bowl and utensils are completely dry.
Chef’s secret: Remove the chocolate from the heat before every piece has melted. Residual heat will finish the job and reduce the risk of burning it.
Step 8: Add the Chocolate Layer
Remove the chilled base from the refrigerator. Pour the chocolate mixture over it and spread it quickly with the back of a spoon or an offset spatula.
Gently tilt the tin to help the chocolate reach the corners. Work while the topping is still warm and fluid.
The peanut butter keeps the chocolate layer softer than plain melted chocolate, making the finished bars easier to cut.
Step 9: Decorate the Bars
Immediately sprinkle the chopped peanuts over the chocolate before it begins to set. Add a small pinch of flaky sea salt if desired.
Press the largest peanut pieces very gently into the topping so they stay attached after chilling.
Optional variation: For a more elegant finish, drizzle a teaspoon of warmed peanut butter over the chocolate and draw a skewer through it to create a marbled pattern.
Step 10: Chill Until Firm
Return the tin to the refrigerator for 30–60 minutes, or until the chocolate layer feels firm.
For the neatest slices, the bars should be thoroughly chilled but not frozen solid.
Step 11: Cut into Bars
Lift the dessert out of the tin using the parchment handles. Place it on a cutting board and remove the paper.
For clean slices, warm a sharp knife under hot water, wipe it completely dry and cut with firm downward movements. Clean and warm the knife again between cuts.
Cut the slab into 12 rectangular bars or 16 smaller squares.
Chef’s tip: If the chocolate cracks, leave the slab at room temperature for 5–10 minutes before slicing. This will soften the topping slightly.
Storage Instructions
Keep the bars in an airtight container.
- Refrigerator: up to 7 days
- Freezer: up to 2 months
- Room temperature: approximately 30 minutes, depending on room temperature
Separate layers with parchment to prevent the bars from sticking together.
To serve frozen bars, leave them in the refrigerator overnight or at room temperature for approximately 15 minutes.
Nutrition
Approximate nutrition per bar, based on 12 bars and including 20 g of chopped peanuts:
- Energy: approximately 225 kcal
- Protein: approximately 6 g
- Carbohydrates: approximately 22 g
- Fat: approximately 14 g
- Saturated fat: approximately 5 g
- Fibre: approximately 3 g
- Sugars: approximately 9 g
- Salt: approximately 0.1 g
Values are estimates and will vary according to the peanut butter and chocolate used.
Although this recipe contains no refined sugar when made with a suitable dark chocolate, it still contains naturally occurring sugar from maple syrup. “No refined sugar” does not mean sugar-free.
Chef’s Best Tips
- Use the right oats. Traditional rolled oats provide the best chewy texture. Quick oats create softer bars, while very thick jumbo oats can make the base more crumbly.
- Stir natural peanut butter first. Its oil must be completely reincorporated before weighing.
- Adjust the consistency when necessary. Different peanut butter brands absorb oats differently. The mixture should hold together when squeezed.
- Press the base firmly. This is the key to bars that stay intact after slicing.
- Chill the base before adding chocolate. A cold base creates two clean, distinct layers.
- Melt chocolate gently. Dark chocolate can burn surprisingly quickly, especially in a microwave.
- Choose chocolate carefully. For vegan bars, check for milk. For a truly refined-sugar-free version, check which sweetener the chocolate contains.
- Use a warm, dry knife. It produces smooth edges without dragging the chocolate topping.
- Add sea salt. A tiny amount balances the maple syrup and intensifies the chocolate flavour.
- Make smaller portions if desired. These bars are rich and energy-dense, so 16 small squares may be ideal for snacks.
Frequently Asked Questions
Are these bars really made with only five ingredients?
The undecorated bars use five unique ingredients: peanut butter, oats, maple syrup, coconut oil and dark chocolate. Chopped peanuts and sea salt are optional decorations.
Are they ready in five minutes?
The active preparation takes approximately 5–10 minutes. The dessert must also chill for at least 30 minutes before topping and again until the chocolate sets.
Is this recipe completely sugar-free?
No. Maple syrup contains sugar, and many dark chocolates contain refined cane sugar. The recipe can be made without refined sugar by choosing a suitable naturally sweetened chocolate, but it is not sugar-free.
How can I make the bars gluten-free?
Use oats labelled certified gluten-free. Oats are naturally gluten-free but may be contaminated during farming or processing.
Can I use crunchy peanut butter?
Yes. Crunchy peanut butter will give the base more texture. It may be slightly harder to spread and slice neatly.
Can I replace the peanut butter?
Almond, cashew or sunflower seed butter can be used in the same quantity. The flavour and consistency may change, so adjust with a small amount of oats or maple syrup if necessary.
Can I replace the maple syrup?
Agave syrup can be used in the same quantity. Date syrup also works but gives the bars a darker colour and stronger flavour. Thick honey works technically, but the recipe will no longer be vegan.
Can I omit the coconut oil?
It helps the oat layer become firm when chilled. You can omit it, but the base will be softer. Add approximately 10–15 g extra peanut butter if needed.
Why is my base crumbling?
It may not have been pressed firmly enough, or the peanut butter may have been unusually thick. Mix in a teaspoon of maple syrup or peanut butter and compact the base again.
Why is my base too soft?
The peanut butter may be very runny, or the base may need more chilling time. Add one or two tablespoons of oats and refrigerate until firm.
Why did my chocolate become grainy?
The chocolate may have overheated or come into contact with water. Melt it slowly in a completely dry bowl and stir frequently.
Can I make these bars without a food processor?
Yes. No food processor is required. If you want a finer texture, oats can be pulsed in a blender, but this step is optional.
No-Bake Chocolate Peanut Butter Oat Bars
Instructions
- Line a 20 × 20 cm tin with baking parchment.
- Mix 120 g peanut butter with the maple syrup and melted coconut oil until smooth.
- Add the oats and stir until completely coated. The mixture should hold together when pressed.
- Transfer to the tin and compact it very firmly into an even layer.
- Refrigerate for 30 minutes.
- Gently melt the dark chocolate with 48 g peanut butter, stirring until smooth.
- Pour the topping over the chilled base and spread evenly.
- Sprinkle with chopped peanuts and refrigerate for 30–60 minutes, until firm.
- Lift the slab out of the tin and cut it into 12 bars with a warm, dry knife.
Notes
- Blend half the oats for a softer, more cohesive base.
- Stir natural peanut butter thoroughly before weighing.
- Add a teaspoon of maple syrup if the base feels crumbly.
- Press the oat mixture firmly so the bars do not fall apart.
- Use vegan, naturally sweetened chocolate if you want the bars to contain no dairy or refined sugar.
- Let the slab stand for 5–10 minutes if the chocolate cracks during cutting.