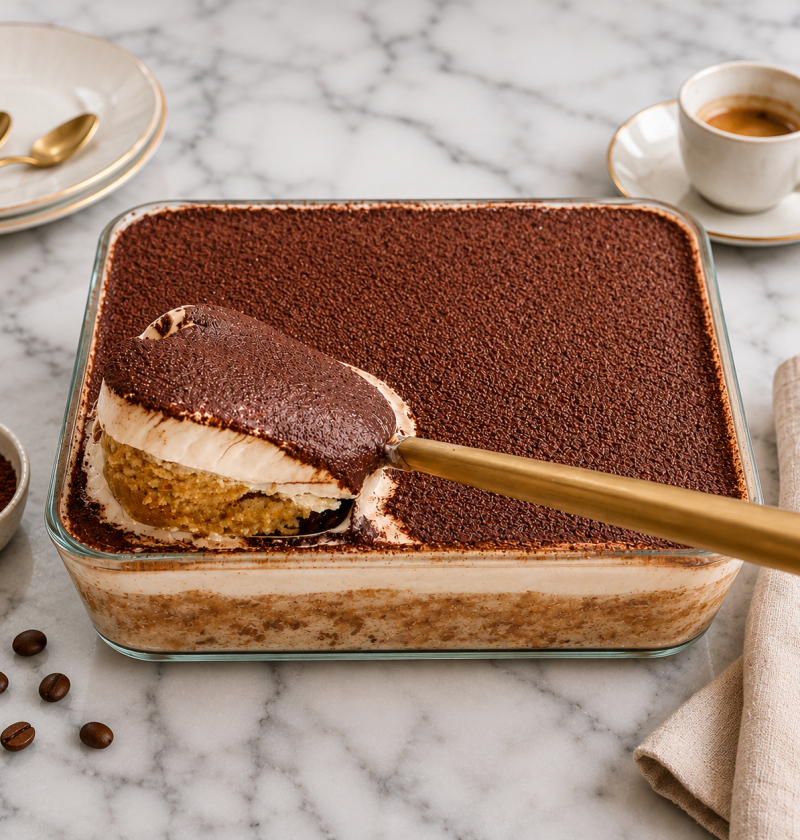
These Tiramisu Baked Oats combine everything you love about a classic Italian dessert with the comfort and convenience of a make-ahead breakfast. The oat base is soft, moist, and deeply flavored with espresso and cocoa, while the thick vanilla yogurt topping creates that signature creamy tiramisu-style finish.
Although the finished dish looks impressive, the preparation is very simple. You do not need a blender, mixer, or any advanced baking skills. I will walk you through every stage so that your baked oats come out tender rather than dry, flavorful rather than bitter, and firm enough to slice once chilled.
This recipe is particularly good for meal prep. Bake the oat layer in advance, allow it to cool completely, add the creamy topping, and refrigerate it overnight. By the next morning, the coffee and cocoa flavors will have developed beautifully, and the texture will be even more dessert-like.
Why You Will Love This Recipe
- It tastes like dessert but is made with simple breakfast ingredients.
- The entire recipe can be prepared in advance.
- No blender or electric mixer is required.
- It contains rolled oats, bananas, nut butter, yogurt, and optional protein powder.
- It can easily be made dairy-free and vegan.
- The flavor becomes even better after chilling.
- It is easy to portion for breakfasts, snacks, or a healthier dessert.
Recipe Overview
Preparation time: 20 minutes
Baking time: 35–40 minutes
Cooling and chilling time: 2 hours minimum
Total time: Approximately 3 hours
Servings: 9
Baking dish: 20 × 20 cm or 23 × 23 cm
r.
For the Creamy Yogurt Layer
- 720 g thick plain yogurt
- 32 g cashew butter or almond butter
- 2.5 ml vanilla extract
- 25 g vanilla protein powder, optional but recommended
- 15–30 ml maple syrup, optional and adjusted to taste
- 1 small pinch of fine salt
- 3–5 g cocoa powder, for dusting
Choosing the Right Ingredients
Bananas
Use bananas that are ripe and covered with a few brown spots. They should be soft and sweet but not fermented or watery.
Ripe bananas provide sweetness, moisture, and structure. Firm yellow bananas will not mash as smoothly and may leave the baked oats less sweet and slightly dry.
Rolled Oats
Use traditional rolled oats, sometimes labelled old-fashioned oats. Avoid steel-cut oats because they will not soften sufficiently during the baking time.
Quick oats can be used, but the finished texture will be softer and more compact. Rolled oats produce the best balance between a tender interior and clearly defined oat texture.
Coffee
A strong coffee flavor is essential because the coffee will be diluted by the milk, bananas, oats, and yogurt. Use freshly prepared espresso or a fairly concentrated instant coffee mixture.
Do not add dry instant coffee directly to the batter. Dissolving it first prevents bitter granules and distributes the coffee flavor evenly.
Yogurt
Choose a very thick plain yogurt. Greek yogurt, skyr, thick soy yogurt, or another strained plant-based yogurt works well.
Thin yogurt may slide off the oat layer or release liquid during storage. When using a thinner yogurt, strain it through a clean cheesecloth or fine sieve in the refrigerator for one to two hours.
Protein Powder
Protein powder is optional, but it improves the creamy layer by making it thicker and more stable. Vanilla protein powder also adds sweetness and reinforces the dessert-like flavor.
Different protein powders absorb different amounts of moisture. Add it gradually and stop if the topping becomes too thick.
Equipment
- 20 × 20 cm or 23 × 23 cm baking dish
- Two large mixing bowls
- Fork or potato masher
- Whisk
- Flexible spatula or wooden spoon
- Measuring jug
- Kitchen scales
- Fine sieve for dusting the cocoa powder
Detailed Step-by-Step Instructions
Step 1: Preheat the Oven and Prepare the Baking Dish
Preheat the oven to 175°C conventional or 160°C fan-assisted.
Lightly grease a 20 × 20 cm or 23 × 23 cm baking dish with neutral oil, vegan butter, or regular butter. For easy removal, line the bottom and two opposite sides with baking paper, leaving enough paper extending over the edges to use as handles.
A 20 cm dish will produce thicker, softer slices and may require a few additional minutes in the oven. A 23 cm dish creates a thinner oat layer that will usually bake slightly faster.
Step 2: Prepare the Coffee
Prepare 180 ml of espresso and leave it to cool until warm rather than piping hot.
When using instant coffee, dissolve 10–12 g of instant coffee completely in 180 ml of hot water. Stir well and allow it to cool for five to ten minutes.
Very hot coffee can make nut butter difficult to combine smoothly and may begin affecting the other ingredients before the batter reaches the oven.
Step 3: Mash the Bananas
Place the peeled bananas in a large mixing bowl. Mash them thoroughly with a fork or potato masher until they form a mostly smooth purée.
Take your time with this stage. Large banana pieces can create wet pockets in the finished baked oats. A few very small pieces are fine, but the mixture should resemble thick applesauce.
Step 4: Combine the Wet Ingredients
Add the soy milk, cooled espresso, maple syrup, cashew or almond butter, vanilla extract, and apple cider vinegar to the mashed bananas.
Whisk until the nut butter is completely incorporated and the mixture looks evenly combined.
When the nut butter is very firm, warm it for approximately 10 seconds in a microwave or place the closed jar in warm water for a few minutes. It should be fluid enough to whisk but not hot.
The vinegar will not make the baked oats taste sour. It reacts with the baking soda and helps create a lighter, softer texture.
Step 5: Combine the Dry Ingredients
In a separate large bowl, add the rolled oats, cocoa powder, protein powder, baking powder, baking soda, and salt.
Stir thoroughly, breaking up any lumps of cocoa powder or protein powder.
This stage may seem minor, but it is important. Baking soda or baking powder concentrated in one area can create bitter spots and uneven rising.
For the smoothest result, sift the cocoa powder and protein powder before adding them to the oats.
Step 6: Make the Batter
Pour the wet mixture into the bowl containing the dry ingredients.
Stir slowly with a spatula until every oat is coated and no dry pockets remain at the bottom of the bowl. Scrape around the sides and across the base of the bowl several times.
Leave the mixture to stand for five minutes. This short rest allows the rolled oats to begin absorbing the liquid and helps the batter bake more evenly.
The batter should look quite loose before baking. Do not add extra oats simply because it appears wetter than cake batter. The oats will absorb a considerable amount of liquid in the oven.
Step 7: Fill the Baking Dish
Pour the batter into the prepared baking dish.
Spread it evenly, paying particular attention to the corners. Gently tap the dish on the work surface once or twice to settle the mixture and remove any large air pockets.
Smooth the top with the back of a spoon or spatula.
Step 8: Bake
Bake on the middle oven rack for approximately 35–40 minutes.
Begin checking at 34 minutes, especially when using a 23 cm dish. The baked oats are ready when:
- The edges look set.
- The surface is no longer wet or glossy.
- The center feels softly firm when pressed.
- A skewer inserted into the middle comes out without liquid batter.
A few moist oat crumbs on the skewer are perfectly acceptable. Do not wait until the skewer is completely dry because that can result in overbaked, dry oats.
The center may still feel slightly soft while hot. It will continue to firm as it cools.
Step 9: Cool Completely
Place the baking dish on a cooling rack and leave the baked oats at room temperature until completely cool, usually for at least one hour.
Do not spread yogurt over warm baked oats. Even slightly warm oats can thin the yogurt, cause it to release liquid, and make the topping slide.
For the neatest layers, refrigerate the cooled oat base for 20–30 minutes before adding the yogurt topping.
Step 10: Soften the Nut Butter for the Topping
Place the cashew or almond butter in a medium bowl.
When it is very thick, warm it for 5–10 seconds in the microwave. It should become softer but must not be hot.
Add the vanilla extract and one or two spoonfuls of yogurt. Stir until completely smooth.
This is an important professional technique called tempering. Mixing the nut butter with a small amount of yogurt first prevents stubborn lumps from forming when the remaining yogurt is added.
Step 11: Finish the Yogurt Cream
Add the remaining yogurt, the small pinch of salt, and the optional protein powder.
Stir gently until the mixture is creamy and uniform. Avoid beating it aggressively because some yogurts can become thinner when overmixed.
Taste the cream before adding maple syrup. Depending on the yogurt and protein powder, it may already be sweet enough. Add the maple syrup gradually, approximately one teaspoon at a time.
The ideal topping should be thick enough to hold soft swirls from a spoon.
When the topping feels too thick, add one teaspoon of soy milk. When it feels too loose, add a small amount of protein powder or place it in the refrigerator for 20 minutes.
Step 12: Assemble the Tiramisu Baked Oats
Spoon the yogurt mixture over the completely cooled oat base.
Spread it carefully from the center toward the edges. Use the back of a spoon to create soft decorative swirls across the surface.
Cover the baking dish and refrigerate for at least one hour. For the best flavor and cleanest slices, refrigerate it overnight.
Chilling allows the oat base to set and gives the coffee, cocoa, and vanilla flavors time to blend.
Step 13: Add the Cocoa Powder
Dust the surface with cocoa powder immediately before serving.
Place the cocoa powder in a small fine sieve and gently tap the side of the sieve while moving it over the yogurt layer. This creates a thin, even coating without heavy or bitter patches.
Cocoa powder absorbs moisture from yogurt over time and becomes dark. The flavor will still be good, but the surface will look less attractive. For that reason, dust each portion shortly before serving.
Step 14: Slice and Serve
Use a sharp knife to cut the chilled baked oats into nine squares.
Wipe the knife clean between cuts for neat, visible layers. A thin offset spatula is useful for lifting the first serving from the dish.
Serve chilled for the most authentic tiramisu-like texture. The portions can also stand at room temperature for 10–15 minutes before serving if you prefer a softer consistency.
Chef’s Best Tips
Use Strong Coffee
The coffee must remain noticeable after it is combined with the other ingredients. Mild coffee may disappear almost completely. Espresso or concentrated instant coffee gives the best result.
Cool the Coffee Before Mixing
The coffee does not have to be cold, but it should not be boiling. Warm or room-temperature coffee mixes more smoothly with the bananas and nut butter.
Weigh the Oats
Cup measurements for oats can vary significantly depending on how tightly they are packed. For consistent results, use 200 g of rolled oats.
Do Not Add the Yogurt to Warm Oats
This is the most important assembly rule. Warm oats will loosen the yogurt and can cause the topping to become watery.
Choose a Thick Yogurt
The yogurt layer is meant to resemble tiramisu cream. Thick Greek-style or strained yogurt will give you a stable topping and clean slices.
Taste the Topping Before Sweetening
Bananas, maple syrup, flavored protein powder, and different yogurt brands all provide different sweetness levels. Add extra maple syrup only after tasting.
Do Not Overbake
The oats will continue setting as they cool. Removing them when the middle is just set keeps the final texture soft and pudding-like rather than dry and crumbly.
Chill Before Slicing
Warm baked oats taste pleasant, but chilling transforms the recipe. The oat base becomes firmer, the layers become more defined, and the coffee flavor becomes deeper.
Dust the Cocoa at the Last Moment
Freshly dusted cocoa produces the most attractive finish. Dusting too early will cause the powder to absorb moisture and darken.
For an Extra Tiramisu Flavor
Add ½ teaspoon of almond extract to the yogurt topping or a small amount of rum extract to the oat batter. Use extracts sparingly because they can quickly overpower the coffee.
Variations
Fully Vegan Tiramisu Baked Oats
Use thick unsweetened soy yogurt or coconut yogurt and confirm that the protein powder is plant-based.
Soy yogurt generally provides more protein and a more neutral flavor. Coconut yogurt creates a richer topping but may add a noticeable coconut taste.
Nut-Free Version
Replace the cashew or almond butter with sunflower seed butter or tahini.
Tahini has a more pronounced flavor, so start with slightly less in the yogurt topping and adjust after tasting.
Sweeter Dessert Version
Increase the maple syrup in the oat base by 15–30 ml and sweeten the yogurt topping to taste.
Chocolate Tiramisu Version
Add 40–50 g of dark chocolate chips to the oat batter before baking.
Mocha Hazelnut Version
Use hazelnut butter instead of cashew or almond butter. Finish each serving with finely chopped toasted hazelnuts.
Higher-Protein Version
Use both portions of protein powder and choose a high-protein Greek yogurt, skyr, or soy yogurt.
When adding more protein powder than the recipe specifies, additional milk may be required because protein powder absorbs moisture.
Make-Ahead Instructions
The oat base can be baked one day before assembly. Cool it completely, cover the baking dish, and refrigerate it.
Prepare and add the yogurt layer later that day or the following morning. For the best presentation, wait until shortly before serving to add the cocoa powder.
The fully assembled recipe is especially good after resting overnight.
Storage
Cover the baking dish tightly or transfer individual portions to airtight containers.
Store the assembled Tiramisu Baked Oats in the refrigerator for up to four days.
Because the recipe contains a yogurt topping, it should not be stored at room temperature for extended periods.
Freezing
For the best texture, freeze the baked oat base without the yogurt topping.
Cut the cooled base into portions, wrap each portion well, and freeze for up to two months. Defrost overnight in the refrigerator, then add the fresh yogurt layer.
The assembled recipe can technically be frozen, but some yogurts become grainy or release water after thawing.
Frequently Asked Questions
Can I use regular dairy milk instead of soy milk?
Yes. Regular milk, oat milk, almond milk, or another unsweetened milk can be used.
Soy milk provides a little more protein and creates a rich texture, but it is not essential to the structure of the recipe.
Can I use brewed coffee instead of espresso?
Yes, but make it stronger than ordinary drinking coffee. Weak coffee may not provide enough flavor after it is mixed with the oats and yogurt.
Use 180 ml of strong brewed coffee and allow it to cool before adding it.
Can I leave out the protein powder?
Yes. The protein powder is completely optional.
Without it, the baked oat base may be slightly softer and the yogurt topping slightly less thick. Choose a naturally thick yogurt to compensate.
Can I blend the batter?
Yes. Blending creates a smoother, cake-like result.
For a classic baked-oat texture, leave the rolled oats whole. For a texture closer to a soft breakfast cake, blend the wet ingredients and oats until smooth before adding the raising agents.
Why are my baked oats dry?
The most common reasons are too many oats, an oversized baking dish, or baking for too long.
Use metric weights, begin checking the oats early, and remove them once the center is set but still soft.
Why is the center too wet?
The oats may need several additional minutes in the oven, especially when using a smaller, deeper baking dish.
Also allow the oats to cool before assessing the final texture. They firm considerably as they cool.
Why did my yogurt layer become runny?
The oat base may have been warm, the yogurt may have been too thin, or the topping may have been overmixed.
Use thick yogurt, cool the base completely, and stir the topping only until combined.
Can I use frozen bananas?
Yes. Defrost them completely and include the liquid they release.
Because thawed bananas can be particularly watery, weigh approximately 230 g and make sure the baked center is fully set before removing the dish from the oven.
Can I make this recipe gluten-free?
Yes. Use rolled oats that are specifically certified gluten-free. Ordinary oats may be processed in facilities that also handle wheat.
Check the protein powder and other packaged ingredients as well.
Can I serve the baked oats warm?
The oat base can be served warm, but the yogurt topping should be added only after it has cooled.
For a warm breakfast, reheat an individual piece of the oat base and serve the cold yogurt cream on the side.
Can I prepare individual portions?
Yes. Divide the batter among oven-safe ramekins or a muffin tin.
Smaller portions will bake more quickly, so begin checking them after approximately 20 minutes.
Nutrition Information
Approximate nutrition per serving, based on 9 servings and calculated using unsweetened soy milk, thick plain soy yogurt, both optional portions of protein powder, and no additional maple syrup in the topping:
- Calories: 275 kcal
- Protein: 15 g
- Carbohydrates: 33 g
- Fat: 10 g
- Fibre: 4 g
- Sugars: Approximately 13 g
Nutritional values are estimates and will vary depending on the yogurt, protein powder, nut butter, milk, and amount of maple syrup used.
Serving Suggestion
For a café-style presentation, place one chilled square on a small plate, add a fresh dusting of cocoa powder, and serve it with berries or a few dark chocolate shavings.
The baked oats are creamy and satisfying on their own, so keep additional toppings simple. The coffee and cocoa should remain the main flavors.
Tiramisu Baked Oats
Instructions
- Preheat the oven to 175°C conventional or 160°C fan-assisted. Lightly grease and line a 20 × 20 cm or 23 × 23 cm baking dish.
- Mash the bananas in a large bowl until smooth.
- Whisk in the soy milk, cooled espresso, maple syrup, nut butter, vanilla, and apple cider vinegar.
- In a separate bowl, mix the rolled oats, cocoa powder, optional protein powder, baking powder, baking soda, and salt.
- Pour the wet ingredients into the dry ingredients. Stir until fully combined and leave the mixture to rest for 5 minutes.
- Transfer the batter to the prepared dish and smooth the surface.
- Bake for 35–40 minutes, or until the edges and center are set. A skewer may have a few moist crumbs but should not have liquid batter.
- Cool the baked oats completely.
- To prepare the topping, mix the softened nut butter with the vanilla and two spoonfuls of yogurt until smooth.
- Add the remaining yogurt, salt, and optional protein powder. Stir until creamy. Sweeten with maple syrup to taste.
- Spread the yogurt mixture over the cooled oat base.
- Refrigerate for at least 1 hour, preferably overnight.
- Dust with cocoa powder immediately before slicing and serving.
Notes
- Use strong espresso so the coffee flavor remains noticeable.
- Do not add the yogurt topping while the oat base is warm.
- Use thick Greek-style, skyr, soy, or strained yogurt.
- Certified gluten-free oats can be used for a gluten-free version.
- Store covered in the refrigerator for up to 4 days.
- For freezing, freeze the baked oat base without the yogurt topping.