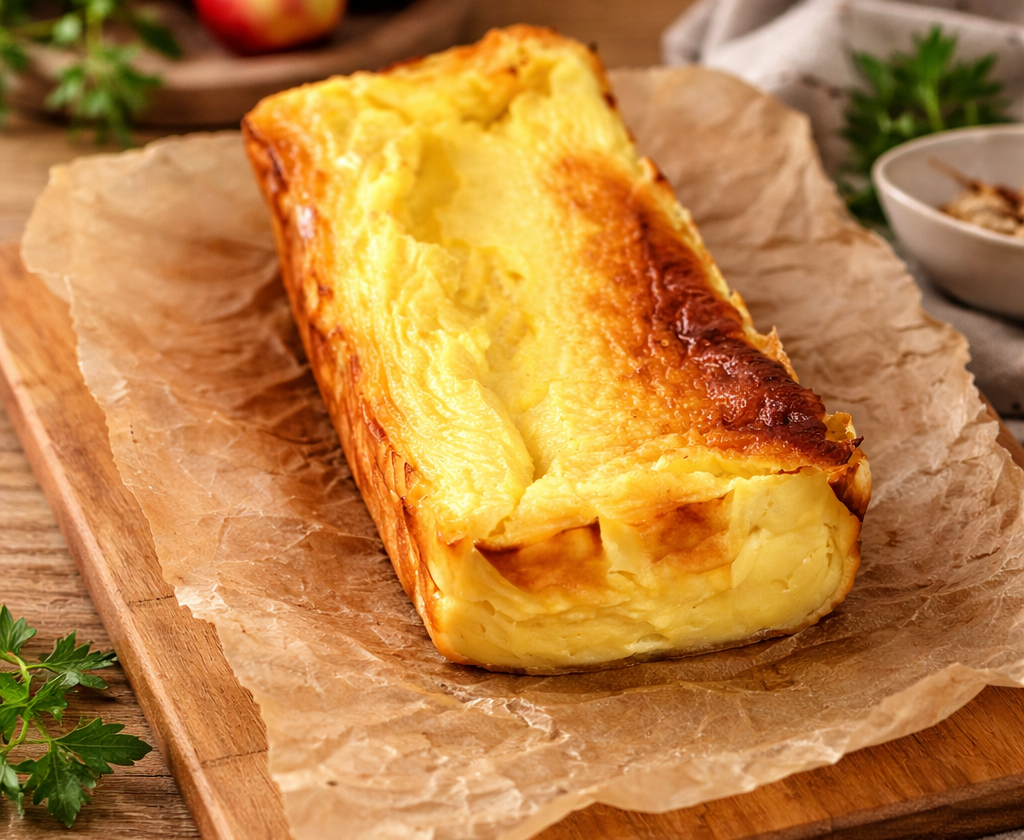
If you are looking for a simple, budget-friendly dessert that feels elegant and comforting, this 3-ingredient yogurt bake is one of the easiest recipes you can make. It is creamy, light, gently tangy, and beautifully soft, with a texture somewhere between a baked custard and a delicate cheesecake.
What I love most about this recipe is that it uses everyday ingredients and still delivers a lovely result. Even if you have almost no baking experience, you can make this successfully by following a few important details. I will walk you through each step like I would in my own kitchen.
Why You’ll Love This Recipe
- Only 3 basic ingredients
- Very easy to prepare
- No mixer required
- Soft, creamy, delicate texture
- Great for dessert or breakfast
- Easy to customize with fruit, honey, cinnamon, or vanilla
Equipment
- Medium mixing bowl
- Whisk
- Silicone spatula or spoon
- 8-inch baking dish or similar small casserole dish
- Oven
- Cooling rack
- Optional: fine sieve for extra smooth batter
Before You Start: A Chef’s Notes for Beginners
This recipe is simple, but small details matter.
Choose the right yogurt
Use plain unsweetened yogurt. Greek yogurt will give a thicker, denser bake. Regular plain yogurt gives a softer, lighter texture. Both work, but if your yogurt is very watery, stir it well first.
Bring ingredients closer to room temperature
Cold ingredients are harder to combine smoothly. If possible, let the eggs and yogurt sit out for about 15 to 20 minutes before mixing.
Do not rush the baking
This bake is delicate. It needs time to set gently. If the top browns too quickly, the center may still be too loose.
Detailed Step-by-Step Recipe
Step 1: Preheat the oven properly
Preheat your oven to 350°F (175°C).
This step matters more than beginners think. A properly preheated oven helps the bake cook evenly from the start. If the oven is not fully heated, the texture may turn uneven, rubbery, or watery in the center.
Chef’s tip:
Place the oven rack in the middle position. This helps the top color gently without overbrowning.
Step 2: Prepare your baking dish
Lightly grease your baking dish with a little butter or neutral oil, or line it with parchment paper if you want easier removal.
You can bake it directly in an unlined ceramic or glass dish, but a light greasing helps prevent sticking around the edges.
Chef’s secret:
If you want very neat slices, line the bottom and two sides with parchment paper, leaving a little overhang so you can lift the bake out after cooling.
Step 3: Add the yogurt to the bowl
Spoon the yogurt into a medium mixing bowl.
If the yogurt has separated a little, stir it first so the liquid and solids are evenly combined. This helps create a smooth batter.
What you are looking for:
A creamy, evenly mixed yogurt without too much extra liquid sitting on top.
Step 4: Add the eggs
Crack in the 3 eggs one at a time.
Whisk gently but thoroughly until the eggs are fully blended into the yogurt. At this stage, the mixture should look pale, creamy, and fluid, with no visible streaks of egg white.
Beginner advice:
Do not beat aggressively like you are making whipped eggs. You want a smooth mixture, not a foamy one. Too much air can make the bake puff up too much in the oven and then collapse sharply.
Step 5: Add the cornstarch slowly
Sprinkle the cornstarch into the bowl gradually while whisking.
Do not dump all the cornstarch in one place if you can avoid it. Cornstarch loves to form little lumps, especially in wet mixtures.
Whisk until the batter is completely smooth and lump-free.
Chef’s trick for a silky texture:
Sift the cornstarch through a fine sieve directly into the bowl. This is one of the easiest ways to prevent lumps, especially if you are new to baking.
How the batter should look:
Smooth, pourable, creamy, and slightly thicker than pancake batter.
Step 6: Rest the batter briefly
Let the batter sit for 3 to 5 minutes before pouring it into the dish.
This short rest gives the cornstarch time to hydrate and allows any bubbles to rise to the top.
Why this helps:
A rested batter bakes more evenly and gives a smoother final texture.
Step 7: Pour into the baking dish
Pour the batter into your prepared dish. Use a spatula to scrape every bit from the bowl.
Tap the dish very gently on the counter once or twice to release trapped air bubbles.
Chef’s note:
Do not tap too hard. This is a delicate mixture, not a heavy cake batter.
Step 8: Bake gently
Place the dish in the preheated oven and bake for about 50 minutes.
The exact time can vary depending on:
- the depth of your baking dish
- whether you use Greek or regular yogurt
- your oven’s real temperature
How to know it is ready:
- The top should look lightly golden
- The edges should look set
- The center should still have a slight wobble, like a cheesecake, but should not look liquid
Important:
Do not keep baking until the center is completely stiff in the oven. It will continue to set as it cools.
If the top browns too quickly:
Loosely cover with foil for the last 10 to 15 minutes.
Step 9: Cool slowly
Remove the bake from the oven and place it on a cooling rack.
Let it cool in the dish for at least 30 to 45 minutes before slicing. For the best texture, chill it in the refrigerator for 1 to 2 hours after cooling.
Why cooling matters:
Right out of the oven, the bake is still delicate and soft. Cooling allows the structure to finish setting, so the texture becomes creamy and sliceable instead of loose.
Chef’s secret:
This dessert is actually even better slightly chilled. The flavor becomes cleaner and the texture more refined.
Step 10: Serve
Slice and serve as is, or add your favorite toppings.
Delicious serving ideas:
- Fresh berries
- Honey
- A dusting of cinnamon
- Lemon zest
- Vanilla yogurt on the side
- Fruit compote
- Powdered sugar
Because the base is mild and creamy, it works beautifully with both fresh and sweet toppings.
Texture and Flavor
This is not a fluffy cake in the traditional sense. Think of it more as a light yogurt custard bake with a soft, creamy interior and a delicate golden top. The flavor is mild, slightly tangy, and pleasantly rich without being heavy.
Common Mistakes to Avoid
1. Using flavored or sweetened yogurt
This changes both the texture and the sweetness level. Plain yogurt works best.
2. Not mixing the cornstarch well
Lumps of cornstarch will leave a chalky texture. Whisk well or sift it first.
3. Overbaking
Overbaking can make the bake dry, rubbery, or eggy.
4. Slicing while hot
It may look done, but it still needs time to settle. Let it cool first.
5. Using a very large dish
If the batter is spread too thin, the bake may cook too quickly and lose its creamy texture.
Chef’s Best Tips
- Use full-fat yogurt for the richest, creamiest result.
- Sift the cornstarch for the smoothest batter.
- Do not over-whisk; too much air can affect texture.
- Bake in the center of the oven for even cooking.
- Remove it when the center still jiggles slightly.
- Chill before serving for the cleanest slices.
- Add vanilla, lemon zest, or a spoonful of honey only if you want a more dessert-like flavor, but keep in mind that the original recipe is just 3 ingredients.
- If your oven runs hot, start checking at 45 minutes.
Nutrition
Estimated nutrition per serving
Based on 6 servings, plain whole-milk yogurt, and large eggs.
- Calories: 110
- Protein: 6 g
- Fat: 5 g
- Carbohydrates: 10 g
- Sugar: 4 g
- Fiber: 0 g
- Sodium: 55 mg
Nutrition may vary depending on the brand of yogurt used.
FAQ
Can I use Greek yogurt?
Yes. Greek yogurt works very well and gives a thicker, slightly denser texture. Regular plain yogurt gives a softer bake.
Can I make it sweet?
Yes. The base recipe is quite neutral. You can serve it with honey, maple syrup, fruit, or powdered sugar. You can also mix in a little sugar, but then it is no longer the original 3-ingredient version.
Why is my bake watery?
Usually this happens because:
- the yogurt was too watery
- it was underbaked
- it was sliced before cooling
Let it cool completely, and chill it for the best texture.
Can I make it ahead of time?
Yes. This is a great make-ahead recipe. Store it in the refrigerator and serve chilled or at cool room temperature.
How do I store it?
Cover and refrigerate for up to 3 days.
Can I freeze it?
You can, but the texture may change slightly after thawing. It is best enjoyed fresh or refrigerated.
Can I add flavorings?
Absolutely. Vanilla, cinnamon, lemon zest, orange zest, or berries all work nicely. Add them gently so the batter stays smooth.
3-Ingredient Yogurt Bake
Instructions
- Preheat oven to 350°F (175°C). Grease or line a small baking dish.
- Add yogurt to a mixing bowl.
- Crack in the eggs and whisk until smooth.
- Add cornstarch gradually and whisk until lump-free.
- Let the batter rest for 3 to 5 minutes.
- Pour into the prepared baking dish.
- Bake for about 50 minutes, until the top is lightly golden and the center is just set.
- Cool for 30 to 45 minutes, then chill if desired before serving.
Notes
- Use plain unsweetened yogurt.
- Greek yogurt gives a thicker texture.
- Do not overbake; the center should still wobble slightly.
- Best served chilled or at room temperature.


