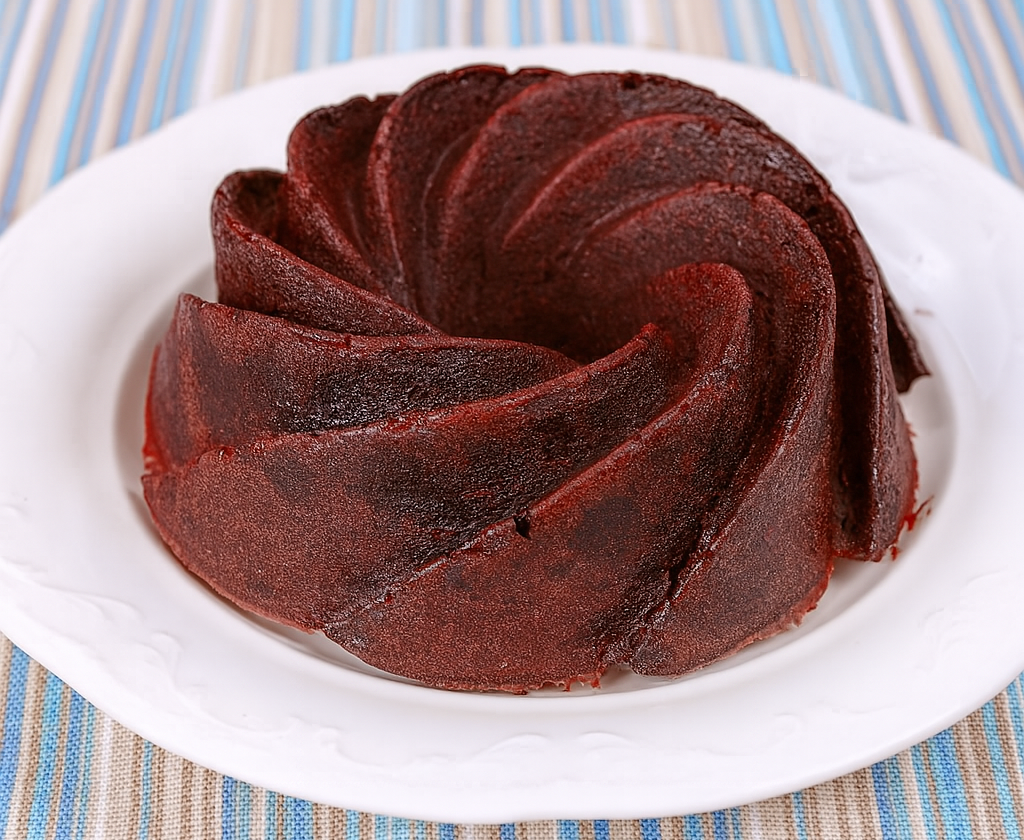
This apple chocolate cake is perfect when you want something sweet, simple, and homemade without using flour, butter, milk, or refined sugar. The base is made from apples, eggs, and unsweetened cocoa powder. The result is not a classic fluffy sponge cake, but a moist, rich, brownie-style chocolate cake with a soft texture.
Important chef’s note: If you want this recipe to be truly without added sugar, use vanilla extract, sugar-free vanilla paste, or ground vanilla. Vanilla sugar contains sugar, so it does not fit the “no added sugar” claim.
Recipe Information
Prep time: 5 minutes
Baking time: 30 minutes
Total time: 35 minutes
Servings: 6–8 slices
Baking pan: small pan, about 18–20 cm / 7–8 inches
Oven temperature: 180°C / 350°F conventional oven or 160°C / 320°F fan oven
Ingredients
For 1 small cake:
- 2 medium apples, about 300–350 g whole, or 250–300 g peeled and cored
- 2 eggs, medium or large
- 100 g unsweetened cocoa powder
- 1 tsp vanilla extract or ¼ tsp ground vanilla
Optional, but no longer “no added sugar”:
- 1 tsp vanilla sugar instead of vanilla extract
For the pan:
- a little neutral oil or parchment paper
Step-by-Step Instructions
1. Preheat the oven properly
Preheat your oven to 180°C / 350°F. If using a fan oven, set it to 160°C / 320°F.
This step matters more than many beginners realize. If the cake goes into an oven that is not fully heated, it may bake unevenly. The outside can dry out while the center stays too soft.
2. Prepare the baking pan
Lightly grease a small baking pan with neutral oil or line it with parchment paper.
For this recipe, I recommend parchment paper. The cake is very moist and contains almost no fat, so it can be more delicate than a traditional butter cake. Parchment paper makes it much easier to lift the cake out after baking.
3. Prepare the apples
Wash the apples well. Peel them if you want a smoother texture. If you have a powerful blender, you can leave the peel on.
Cut the apples into quarters, remove the core, and chop the flesh into smaller pieces.
The smaller the apple pieces, the easier it will be for the blender to turn them into a smooth mixture. This is especially helpful if you are not using a high-powered blender.
4. Blend the apples first
Place the apple pieces into the blender and blend briefly until they turn into a moist apple purée.
This is a small professional trick: blending the apples first creates a smoother batter later. If you add everything at once, the cocoa powder can stick to the sides of the blender and make the batter harder to mix evenly.
5. Add the eggs and vanilla
Add the eggs and vanilla to the apple purée.
Blend until the mixture looks smooth, slightly foamy, and even. The eggs do more than bind the batter; they also help the cake set and hold its shape while baking.
Make sure there are no large apple pieces left. Large pieces can release water during baking and make the center of the cake too wet.
6. Add the cocoa powder carefully
Add the cocoa powder in portions. Start blending on low speed so the cocoa does not fly out of the blender. Then blend briefly on a higher speed until you have a smooth, dark chocolate batter.
The batter will be thick and compact. That is completely normal. It should not be as runny as pancake batter, but it should not look dry or crumbly either.
If your blender struggles, stop it, scrape down the sides with a spatula, and blend again briefly.
7. Check the batter
The finished batter should be evenly dark, creamy, and free from dry cocoa pockets.
Do not taste too much of the raw batter, as it contains raw eggs. You can, however, check the texture. If the batter seems very thick, let it rest for 2 minutes. The apples will release a little moisture, and the cocoa powder will absorb liquid more evenly.
8. Pour the batter into the pan
Pour the batter into the prepared pan and smooth the surface with a spatula.
Gently tap the pan once or twice on the countertop. This helps remove large air bubbles and allows the cake to bake more evenly.
9. Bake the cake
Bake the apple chocolate cake for about 30 minutes at 180°C / 350°F.
Start checking after 25 minutes. Insert a wooden skewer into the center. It may come out slightly moist, but there should not be raw batter sticking to it.
This cake is meant to stay moist inside. Do not overbake it, or it will lose its soft, brownie-like texture.
10. Let the cake cool
Remove the cake from the oven and let it cool in the pan for at least 20–30 minutes.
This is one of the most important steps. Right after baking, the cake is still soft and delicate. As it cools, it becomes firmer and easier to slice.
For an even better texture, let it cool completely and place it in the refrigerator for 1 hour. It will become firmer, richer, and more intensely chocolatey.
Chef’s Best Tips
1. Use sweet apples.
Since there is no added sugar, the sweetness depends mostly on the apples. Gala, Fuji, Golden Delicious, Jonagold, or Pink Lady work especially well.
2. Use unsweetened cocoa powder.
Baking cocoa is best. Drinking cocoa usually contains sugar and sometimes milk powder, so it is not suitable for this recipe.
3. Do not overbake.
The cake should remain moist. If the skewer comes out completely dry, the cake has probably baked a little too long.
4. Use a small pan.
A large pan will make the cake very flat. For the best result, use an 18–20 cm / 7–8 inch pan.
5. Let the batter rest briefly.
If you have an extra 5 minutes, let the finished batter rest before baking. The cocoa powder absorbs moisture, and the flavor becomes smoother.
6. Peel the apples for a finer texture.
With the peel, the cake will be slightly more rustic. Without the peel, it will be smoother and softer.
7. Slice only after cooling.
Warm from the oven, this cake is very tender. Patience really pays off here.
Taste and Texture
This cake tastes deeply chocolatey with a mild apple sweetness. It is not extremely sweet; it has a more intense, slightly dark chocolate flavor. The natural sweetness comes only from the apples.
The texture is soft, moist, and compact. Do not expect a light sponge cake. This recipe is more like a quick chocolate apple snack or a healthier brownie-style treat.
Storage
Store the cake in an airtight container in the refrigerator for 2–3 days.
It tastes especially rich when chilled and is easier to slice. Before serving, let it sit at room temperature for about 10 minutes.
Nutrition per Slice
Calculated for 8 slices, without vanilla sugar and without counting oil used for greasing the pan.
Approximate values per slice:
- Calories: about 66 kcal
- Protein: about 4 g
- Fat: about 3 g
- Carbohydrates: about 12.5 g
- Fiber: about 5.5 g
- Sugar: about 4 g, naturally from the apples
Note: Nutrition values are estimates and may vary depending on apple variety, egg size, and cocoa powder brand.
FAQ
Is this cake really sugar-free?
It contains no added sugar if you use vanilla extract or ground vanilla. Apples naturally contain fruit sugar. If you use vanilla sugar, the recipe will contain added sugar.
Can I use vanilla sugar?
Yes, it works for flavor, but then the cake is no longer free from added sugar.
Can I use drinking chocolate instead of cocoa powder?
It is not recommended. Drinking chocolate usually contains sugar and sometimes milk powder. Use unsweetened cocoa powder or baking cocoa instead.
Why is my cake not fluffy?
That is normal for this recipe. It contains no flour, no baking powder, and no added fat. The texture is moist, dense, and brownie-like.
Can I add baking powder?
Yes. You can add ½ tsp baking powder if you want the cake to be slightly lighter. To keep it gluten-free, make sure your baking powder is gluten-free.
Which apples are best?
Sweet, juicy apples are ideal. Gala, Fuji, Golden Delicious, Jonagold, and Pink Lady are good choices.
Can I freeze this cake?
Yes. Let it cool completely, cut it into slices, and freeze the slices in portions. Thaw overnight in the refrigerator.
Why does the cake taste slightly bitter?
100 g cocoa powder gives a very intense chocolate flavor. If your apples are not very sweet, the cake can taste more bitter. For a milder version, use 70–80 g cocoa powder.
Can I make this cake without a blender?
Only with some compromise. The apples need to be finely puréed so the batter holds together well. You can use a fine grater and a whisk, but the texture will be more rustic.
Is this cake gluten-free and dairy-free?
Yes, if you use pure unsweetened cocoa powder and do not grease the pan with butter. Use oil or parchment paper instead.
Quick Apple Chocolate Cake with No Flour and No Milk
Instructions
- Preheat the oven to 180°C / 350°F.
- Line a small baking pan with parchment paper or lightly grease it.
- Wash, core, and chop the apples.
- Blend the apples until smooth.
- Add the eggs and vanilla, then blend again.
- Add the cocoa powder in portions and blend until smooth.
- Pour the batter into the prepared pan and smooth the top.
- Bake for about 30 minutes.
- Let the cake cool for at least 20–30 minutes before slicing.
Notes
- Use sweet apples because there is no added sugar.
- Use unsweetened baking cocoa, not drinking chocolate.
- Do not overbake; the cake should stay moist.
- For a milder chocolate flavor, use 70–80 g cocoa powder.
- Let the cake cool completely before slicing.