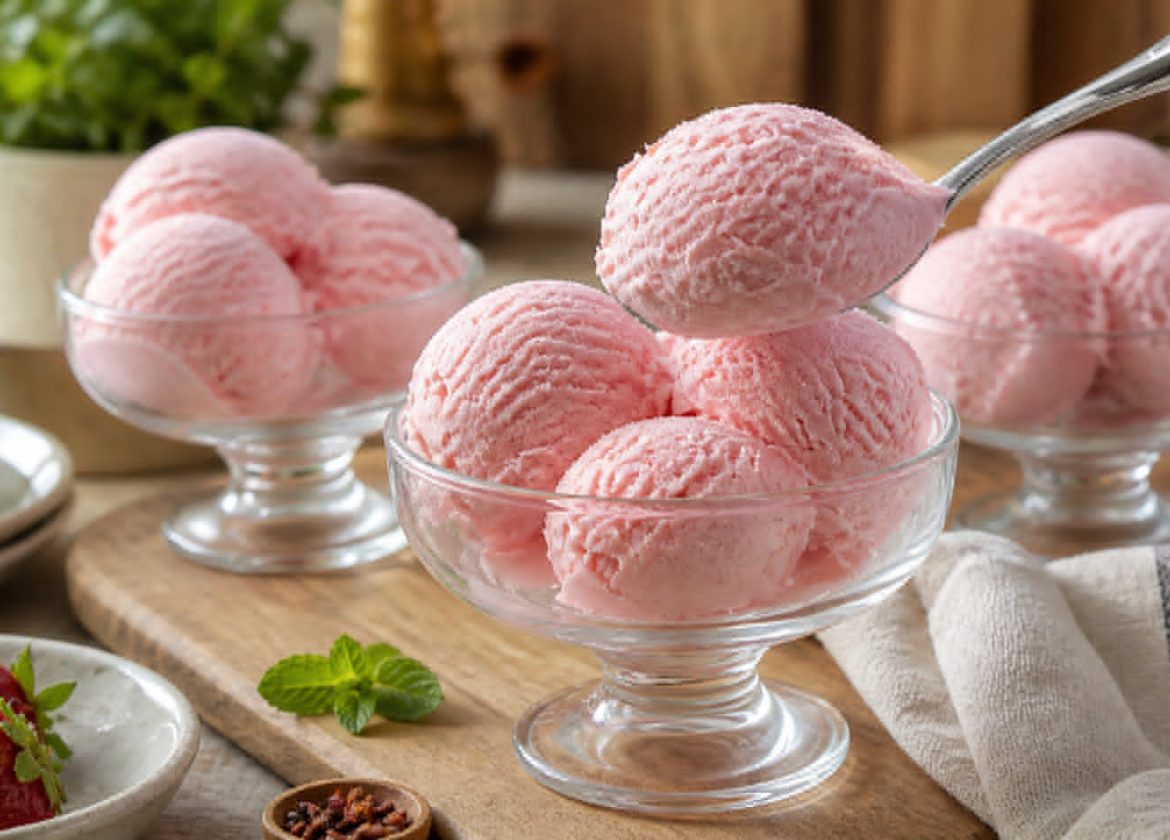
This strawberry banana ice cream is the kind of dessert that looks like it belongs on a restaurant menu but is secretly incredibly simple to make at home. You start with ripe strawberries and a sweet banana, blend them into a silky fruit base and then gently cook it with milk, sugar and a touch of cornstarch until it becomes luxuriously thick. That cooked fruit custard cools down and waits patiently while you whip rich cream and fold it together with sweetened condensed milk, creating a cloud‑like base that feels indulgent from the very first spoonful. When the cooled fruit mixture meets the whipped cream, the result is a beautifully smooth, naturally fruity ice cream that needs no machine and no complicated techniques. The strawberries bring a bright, summery flavour, while the banana adds body and natural sweetness, helping the texture stay creamy even after freezing. Because you control each step, you can make sure the mixture is perfectly smooth, properly chilled and frozen to just the right firmness for scooping. This is the kind of dessert that children adore and adults secretly love just as much, especially when served in pretty bowls or glasses. It is ideal for make‑ahead entertaining, because you can prepare it hours in advance and simply scoop and serve when you are ready. Once you have made it once, you will see how easily this recipe can become your signature fruity ice cream for warm evenings, celebrations or simply a quiet treat at home.
🍓 Enjoy A Spoonful Of Strawberry Banana Ice Cream That Tastes Like Summer In Every Creamy Bite
⏱️ Quick Overview
Prep Time: 25 minutes (plus cooling time)
Cook Time: 10–12 minutes
Total Time: 4 hours 45 minutes–5 hours (including freezing)
Servings: 8 servings
Difficulty: Easy–Medium (simple steps, but requires patience for cooling and freezing)
Category: Frozen Dessert / Ice Cream
Cuisine: Modern Homemade Dessert
Calories: ~260 kcal per serving
🍌 Savour A No‑Churn Ice Cream Where Real Fruit Flavour Meets Luxuriously Smooth Texture
⭐ Why You’ll Love This Recipe
- No‑Churn Creaminess: You get a rich, scoopable ice cream texture without needing an ice cream machine or special equipment.
- Real Fruit Flavour: Fresh strawberries and banana form the base, giving a natural, vibrant taste that feels far from artificial.
- Silky, Stable Texture: Cooking the fruit mixture with cornstarch creates a smooth, thick base that blends beautifully with the cream.
- Make‑Ahead Friendly: You can prepare everything in advance, freeze it and have dessert ready whenever you need it.
- Family‑Friendly Treat: The flavour is gentle, fruity and sweet, making it a hit with both children and adults.
- Customisable Presentation: Serve it in cones, bowls, layered with fresh fruit or topped with nuts and chocolate shavings for a restaurant‑style finish.
- Reliable, Repeatable Method: Each step is clear and structured, so you can recreate the same creamy result every time you make it.
✨ Turn Simple Strawberries And Banana Into A Velvet Dessert That Feels Restaurant‑Worthy At Home
📅 Nutrition Per Serving (entire recipe, 8 servings)
For the whole recipe:
- Calories: ~2,070 kcal
- Protein: ~32 g
- Fat: ~120 g
- Carbohydrates: ~230 g
- Fibre: ~7 g
- Sugars: ~210 g
Per serving (1/8 of the total):
- Calories: ~260 kcal
- Protein: ~4 g
- Fat: ~15 g
- Carbohydrates: ~29 g
- Fibre: ~1 g
- Sugars: ~26 g
(Values are approximate and depend on the exact cream, milk and condensed milk used.)
🍓 Let The Bright Sweetness Of Strawberries And The Soft Warmth Of Banana Shine In Every Scoop
👨🍳 DETAILED STEP‑BY‑STEP RECIPE (Chef‑Level Instructions)
Step 1: Blend The Fruit Base
Add the chopped strawberries and the peeled banana to a blender and blend until the mixture is completely smooth, with no visible pieces of fruit remaining.
💡 If your blender struggles, pulse a few times first, then blend continuously; scraping down the sides once helps ensure an even purée.
Step 2: Combine Fruit, Sugar, Milk And Cornstarch
Pour the fruit purée into a saucepan, then add the sugar, milk and cornstarch, whisking thoroughly until the mixture is smooth and the cornstarch is fully dispersed.
💡 Make sure there are no visible white streaks of cornstarch before you start heating, as any lumps now will be harder to remove later.
🍌 Choose A Freezer Dessert That Is Easy To Make Yet Impressively Creamy And Indulgent
Step 3: Cook The Fruit Custard
Place the saucepan over low heat and cook the mixture, stirring constantly with a whisk or spatula, until it thickens and becomes glossy and smooth.
💡 Keep the heat low and be patient; gentle cooking prevents the milk from catching on the bottom and keeps the texture silky.
Step 4: Cool The Fruit Mixture Completely
Remove the saucepan from the heat and pour the thickened fruit mixture into a clean bowl, then press a piece of plastic wrap directly onto the surface to prevent a skin forming and leave it to cool completely at room temperature before chilling if needed.
💡 Do not add hot fruit mixture to the cream later; letting it cool fully is essential to avoid melting the whipped cream and losing volume.
🔥 Watch The Fruit Mixture Thicken Gently On The Hob Before Transforming Into Silky Ice Cream
Step 5: Whip The Cream To Soft Peaks
In a separate large bowl, pour in the cold heavy whipping cream and whip with an electric mixer or whisk until soft peaks form, meaning the cream holds its shape but the tips gently fold over.
💡 Use well‑chilled cream and a cold bowl if possible; cold cream whips faster and more reliably, giving better volume.
Step 6: Add The Sweetened Condensed Milk
Pour the sweetened condensed milk into the whipped cream and gently fold or whisk on low speed until the mixture is smooth and evenly combined without deflating the cream too much.
💡 Fold from the bottom of the bowl upwards in broad strokes, turning the bowl as you go, to keep as much air in the mixture as possible.
🍓 Serve This Ice Cream In Pretty Glasses And Make Any Evening Feel Like A Special Occasion
Step 7: Fold In The Cooled Fruit Custard
Once the fruit mixture is completely cool, add it to the cream mixture in two or three additions, gently folding each time until the colour is uniform and no streaks remain.
💡 If the fruit custard is very thick, loosen it with a quick whisk before folding so it blends more easily into the cream.
Step 8: Transfer To A Freezer‑Safe Container
Pour the finished ice cream mixture into a freezer‑safe container, smoothing the top with a spatula and tapping the container lightly on the counter to remove any large air pockets.
💡 A shallow, wide container helps the mixture freeze more evenly and makes scooping easier later.
🍌 Keep A Tub In The Freezer For Moments When You Crave Something Sweet, Cold And Comforting
Step 9: Freeze Until Firm
Cover the container with a lid or tightly wrapped plastic film and place it in the freezer for 4–6 hours, or until the ice cream is firm enough to scoop cleanly.
💡 For the best texture, avoid opening the freezer too often during the first couple of hours so the mixture can freeze steadily.
Step 10: Scoop And Serve
When you are ready to serve, remove the container from the freezer and let it sit at room temperature for a few minutes to soften slightly, then scoop into bowls or cones and enjoy.
💡 Warming your ice cream scoop briefly in hot water and drying it before each scoop helps you achieve neat, rounded portions.
✨ Enjoy A Dessert That Balances Fresh Fruit Brightness With The Richness Of Whipped Cream
🛒 Ingredients
Fruit Mixture
• 🍓 1 heaping cup strawberries, chopped
• 🍌 1 medium banana
• 🧂 1/2 cup sugar
• 🥛 1 cup milk
• 🌽 2 1/2 tablespoons cornstarch
Cream Mixture
• 🥛 1 cup heavy whipping cream (33–36% fat)
• 🥫 1/2 cup sweetened condensed milk
🍓 Share Scoops With Friends And Family And Let The Flavour Speak For Itself Without Complicated Garnishes
🍽️ Kitchen Tools and 🛠️ Equipment Needed 🔪
• 🥤 Blender — to purée the strawberries and banana into a smooth fruit base
• 🥣 Medium Saucepan — to cook the fruit mixture with sugar, milk and cornstarch
• 🥄 Whisk Or Silicone Spatula — to stir the mixture while cooking and prevent lumps
• 🥣 Mixing Bowls — one for cooling the fruit custard and one for whipping the cream
• ⚡ Electric Hand Mixer Or Stand Mixer — to whip the cream quickly and evenly
• 📏 Measuring Cups And Spoons — to measure sugar, milk, cornstarch and condensed milk accurately
• 🧊 Freezer‑Safe Container With Lid — to freeze and store the ice cream mixture
• 🍨 Ice Cream Scoop — to portion neat scoops for serving
🍌 Make This Your Signature Strawberry Banana Ice Cream For Birthdays, Gatherings And Quiet Nights In
❓ FAQ
- Can I use frozen strawberries instead of fresh ones?
Yes, you can use frozen strawberries, but thaw and drain them first so you do not add excess water to the mixture. - Does the banana flavour dominate the ice cream?
The banana adds body and sweetness, but the strawberries still shine, giving a balanced strawberry‑banana flavour. - Can I reduce the sugar in the recipe?
You can reduce the sugar slightly, but remember that sugar also affects texture and softness, so the ice cream may freeze a little harder. - Why do I need to cook the fruit mixture?
Cooking with cornstarch thickens the fruit base, giving a smoother texture and helping it blend better with the cream. - Can I whip the cream by hand?
Yes, you can whip the cream by hand with a whisk, but it will take longer and require steady, vigorous whisking. - How long will the ice cream keep in the freezer?
If stored in a well‑sealed container, it will keep for about 1–2 weeks with good texture and flavour. - What if my ice cream is too hard to scoop?
Simply leave the container at room temperature for 5–10 minutes to soften slightly before scooping. - Can I add mix‑ins like chocolate chips or nuts?
Yes, you can fold in small chocolate chips, chopped nuts or fruit pieces after combining the cream and fruit mixture, before freezing. - Is it necessary to cover the fruit mixture with plastic wrap while cooling?
Pressing plastic wrap directly onto the surface prevents a skin forming, which keeps the texture smooth when you later fold it into the cream. - Can I make this recipe without condensed milk?
The condensed milk adds sweetness and creaminess; omitting it will change both flavour and texture, so it is best to keep it in this version.
🔥 Discover How Satisfying It Is To Create A No‑Machine Ice Cream With Such A Silky Finish
👨🍳 CHEF’S BEST TIPS
💡 Choose ripe, fragrant strawberries and a spot‑on ripe banana, as the fruit quality directly shapes the final flavour.
💡 Blend the fruit until completely smooth; any remaining chunks can freeze into icy pieces and disrupt the creamy texture.
💡 Stir constantly while cooking the fruit mixture so it thickens evenly and does not catch on the bottom of the pan.
💡 Cool the fruit custard fully before combining with the cream; even slightly warm mixture can deflate the whipped cream.
💡 Whip the cream only to soft peaks, not stiff peaks, so it folds more easily and gives a smoother ice cream.
💡 Fold gently rather than stirring vigorously when combining cream, condensed milk and fruit to preserve as much air as possible.
💡 Use a container with a tight‑fitting lid to protect the ice cream from absorbing freezer odours and forming ice crystals.
💡 For extra flavour, you can add a tiny pinch of salt to the fruit mixture to enhance the sweetness and fruit notes.
💡 If you like a slightly softer texture, you can briefly stir the mixture once halfway through freezing, though it is not essential.
💡 Serve the ice cream with fresh strawberry slices, banana coins or a light drizzle of chocolate sauce for a dessert that looks as good as it tastes.
🍓 Pair Each Scoop With Fresh Berries Or Banana Slices For A Beautiful, Colourful Dessert Bowl
This strawberry banana ice cream brings together the best parts of homemade dessert: real fruit flavour, a creamy texture and a method that feels achievable even on a busy day. The gentle cooking of the fruit base gives you a silky, stable custard that blends seamlessly with the whipped cream and condensed milk. Freezing transforms this mixture into a scoopable, velvety ice cream that tastes like summer in every spoonful. It is the kind of dessert that invites you to slow down for a moment, sit with a bowl and simply enjoy the cool sweetness. Because it is made without an ice cream machine, it feels wonderfully accessible, yet the result is polished enough to serve at a dinner party. Over time, you might play with variations—adding vanilla, a swirl of strawberry coulis or a sprinkle of chocolate—but this core recipe will remain a reliable favourite. Let it become your go‑to fruity ice cream, ready to brighten quiet evenings, family gatherings and celebrations alike. 🍓🍌✨
🍌 Let The Gentle Sweetness Of Condensed Milk Wrap Around The Fruity Notes In Every Mouthful
📦 SHORT RECIPE
Ingredients:
Fruit mixture: 1 heaping cup strawberries (chopped), 1 medium banana, 1/2 cup sugar, 1 cup milk, 2 1/2 tablespoons cornstarch.
Cream mixture: 1 cup heavy whipping cream (33–36% fat), 1/2 cup sweetened condensed milk.
Instructions:
Blend the chopped strawberries and banana until completely smooth.
Pour the fruit purée into a saucepan and add the sugar, milk and cornstarch, whisking until smooth.
Cook over low heat, stirring constantly, until the mixture thickens and becomes glossy and smooth.
Remove from the heat, transfer to a bowl and cover the surface directly with plastic wrap, then cool completely.
In a separate bowl, whip the cold heavy cream to soft peaks.
Add the sweetened condensed milk to the whipped cream and gently mix until combined.
Fold the cooled fruit mixture into the cream mixture until smooth and evenly coloured.
Pour into a freezer‑safe container, cover and freeze for 4–6 hours, or until firm enough to scoop.
Let stand briefly at room temperature before scooping and serving.
Nutrition: ~260 kcal per serving (8 servings).
🍓 Enjoy A Frozen Treat That Starts With Real Fruit Rather Than Artificial Flavours Or Colours
Strawberry Banana Ice Cream
Instructions
- Blend the chopped strawberries and banana until completely smooth.
- Pour the fruit purée into a saucepan and add the sugar, milk and cornstarch, whisking until smooth.
- Cook over low heat, stirring constantly, until the mixture thickens and becomes glossy and smooth.
- Remove from the heat, transfer to a bowl and cover the surface directly with plastic wrap, then cool completely.
- In a separate bowl, whip the cold heavy cream to soft peaks.
- Add the sweetened condensed milk to the whipped cream and gently mix until combined.
- Fold the cooled fruit mixture into the cream mixture until smooth and evenly coloured.
- Pour into a freezer‑safe container, cover and freeze for 4–6 hours, or until firm enough to scoop.
- Let stand briefly at room temperature before scooping and serving.